Quick Eats: Tomato and Mozzarella Sliders

Leave a comment Standard

MozzarellaSliders1

Sunday is my “cheat day” in a weekly regimen of healthy eating. I snack on chips and sweets, or slurp down a Starbucks frappuccino. It’s a nice break before I dive back into the work week come Monday morning, and it gives me something to look forward to by, say, Thursday night when I don’t want to even glance at another fruit or vegetable ever again. Sunday’s snacking/sugar overload is like a reward to myself for making smart, beneficial nutrition choices all week- and it actually encourages me to stick to my long-term diet and fitness plan.

Sunday nights are especially fun, however, as it’s a bit of a tradition to whip up a snack to munch on during new episodes of “The Walking Dead” (bonus points if you don’t gag on your food during an especially gory scene.)  I’ve made tacos, onion rings, shrimp cocktail, etc., over the past couple of seasons, and last night- with a new episode getting closer and closer to airing, I wanted to make something really quick, REALLY easy, and relatively mess-free. These tomato and mozzarella sliders were the first thing to come to mind.

I love these so much that I decided to make a post for anyone who wanted to try them at their next TV viewing party- or just a party in general. They’re a great appetizer and only take about a half hour to prepare and bake.

MozzarellaSliders2

YOU WILL NEED: (*PLEASE NOTE – I didn’t give specific measurement amounts because it varies on the amount of people you’re serving. I prepared enough sliders for two people last night and only used a fraction of these ingredients. Obviously, if you’re serving more people- you will need more.*)

* Olive oil

* Split-top rolls (baguettes work, too!)

* Plum tomatoes

* Package of mozzarella cheese (whether or not it’s pre-sliced is entirely up to you.)

* Fresh basil (minced.)

* 1 Baking pan lined with tin foil.

OKAY, HERE’S WHAT YOU DO:

1. Pre-heat your oven to 350° – 375°, depending on how quickly you want these sliders to cook and how crispy you want them to be.

2. While the oven is heating, slice the split-top rolls width-wise to desired thickness. Place the bread slices flat on the baking pan lined with tin foil.

3. Drizzle a small amount of olive oil onto the slices of bread.

4. Slicing the mozzarella (again- to desired thickness,) place the slice on top of the bread and olive oil. If mozzarella is pre-sliced, simply grab a slice and place it on top. Use more than one slice if you want a thicker amount of melted cheese.

MozzarellaSliders3

MozzarellaSliders4

5. Just like the mozzarella, slice a clean plum tomato width-wise, and place slices on top of the cheese.

6. Using a tablespoon (or a squeeze bottle/tube) add minced basil on top of tomato. Drizzle another small amount of olive oil on top of basil.

7. Carefully place the baking pan in the oven, and cook until the mozzarella has started to melt. (It took about ten minutes for last night’s batch.)

8. Remove the pan from the oven, briefly let the sliders cool to avoid painful tongue-burning, and enjoy!

You can stack these sliders however you wish, too. It’s really one of those “all about preference” sort of snacks that can be mixed and prepared in a variety of ways. This is just the way I, personally, like them.

And luckily, last night’s episode of “The Walking Dead” was more stressful than it was gross- so I was able to enjoy these without dry-heaving.

xo

MozzarellaSliders5

Quick Eats: Homemade Crab Rangoon

Comments 4 Standard

CrabRangoon1

Growing up, ordering Chinese food was always reserved for Christmas Eve and New Years Eve, the two nights out of the year when my mother didn’t want to go anywhere near the kitchen and when most restaurants closed early. We’d sit around our Christmas tree (and on New Years Eve- the television- to watch the ball drop in Times Square,) stuffing our faces with chicken fingers, pork-fried rice, beef teriyaki, etc. and then chow down on the leftovers the following day.

In my early twenties, ordering Chinese food, while still a family tradition, became synonymous with last call at the local bars. We’d place a pick-up order while we finished our final drinks for the night, walk downtown to pick up the food, and nine times out of ten- eat almost all of it while walking to whoever’s apartment we were crashing at for the night. Nothing hit the spot after a couple of whiskey sours than a heaping serving of chicken lo mein.

And now, a few years older, ordering Chinese food (still a Christmas Eve tradition at my mom’s house!) often results in me getting a stomach ache and asking myself how I was able to eat the gigantic portions of it like I did when I was a kid. The only thing that doesn’t seem to make me feel gross after mass consumption is crab rangoon, a long-standing favorite on any take-out menu.

Instead of shelling out money for an order of crab rangoon at one of the many Chinese food places by where I live, I decided to make my own this afternoon. To me, it’s a sort trial and error type of recipe to attempt- but they came out pretty good- if I do say so myself!

CrabRangoon2

CrabRangoon3

CrabRangoon4

YOU WILL NEED:

* 1 Can of bulk crab meat

* 1/2 Brick/package of cream cheese (THIS CAN VARY. The last time these were made, only a small amount of cream cheese was added, and the result, while good- didn’t really taste like traditional rangoon. Depending on your preference, you can add more or less cream cheese. I prefer a little more.)

* 1 Package of won ton wraps (I found mine in the produce section at my local market)

* 1 1/2- 2 Cups of cooking oil

* 1/2 Freshly sliced lemon (or a teaspoon of lemon juice)

* 1 Egg – beaten

* A pastry brush

OKAY, HERE’S WHAT YOU DO:

1. Using a bowl, thoroughly mix the can of bulk crab meat and the 1/2 brick of cream cheese. I find using a fork to mash the ingredients together is helpful. From there, squeeze the 1/2 of freshly sliced lemon over the crab meat and cream cheese (or add the teaspoon of lemon juice) and continue mixing. Add salt and pepper for seasoning.

CrabRangoon5

2. In a pan, add the 1 1/2 cups – 2 cups of oil. Begin heating the oil on your stove top at medium/high.

3. While the oil is heating, lay out the won ton wraps out on a flat surface. Add a teaspoon of the crab/cream cheese/lemon juice mixture in the center of each wrap.

4. Using a pastry brush, dip the brush tip into your beaten egg, and sweep along each edge of the won ton wrap. This allows the edges to stick and stay together when you fold them, and prevents them from breaking apart when you cook them in the oil shortly.

CrabRangoon6

5. Fold together each corner of the won ton wrapper, creating a pocket. By now, your oil should be hot and ready to use.

6. Carefully drop the pockets into the oil. They’ll immediately begin to sizzle as they cook. Using a spatula, you can turn the pockets over in the oil to make sure they’re crisping and browning evenly. Once they reach your desired level of crispiness, use the spatula to remove them from the oil.

CrabRangoon7

CrabRangoon8

7. Set your cooked pockets on folded paper towels to absorb excess oil and allow them to cool.

8. Enjoy! (Chopsticks optional.)

CrabRangoon9

CrabRangoon10

These tasted so delicious- even better than the ones I’ve had in take-out orders in the past. I think the next time my family gets together for the holidays, I’ll whip up a batch of these to switch up our tradition- just a little bit.

Top 10 Photographs of 2013.

Leave a comment Standard

In between visiting with family and friends during the holidays, working, and preparing for New Years- I’ve been drafting my “2013: In a Nutshell” post in my free time. For those who may not know, at the end of every month, I like to summarize said month, talk about any major events/turning points that took place, post any pictures that may not have initially made the cut when I blogged, write about the days to come, etc. My 2013 summary is a lot like that- but for the entire year, of course- including an assortment of news, pop culture, random tidbits and nonsense, etc.

I digress, to prepare- I’ve re-visited some of the photographs I snapped during 2013 (and there were a lot!) and wanted to create a post highlighting my Top 10 of the year and the stories behind them.

So without further ado,

BestOf201310

# 10: Dropkick Murphys, TD Garden (March 15th)

I took a shot of the heavily illuminated stage- and an enthusiastic fan- during the band’s annual series of Saint Patrick’s Day shows in March. The timing of this shot couldn’t have been any better, thanks in part to the guy in front of me who threw his arms up as I was snapping away while the band prepared to launch into a cover of AC/DC’s “TNT.”

This wasn’t my first Dropkick Murphys show of 2013, and it also wouldn’t be my last. I’d go on to see them perform a couple more times over the next few months- one concert in particular being especially poignant as it was a benefit for “The One Fund” to help those directly affected in the Boston Marathon Bombing.

BestOf201319

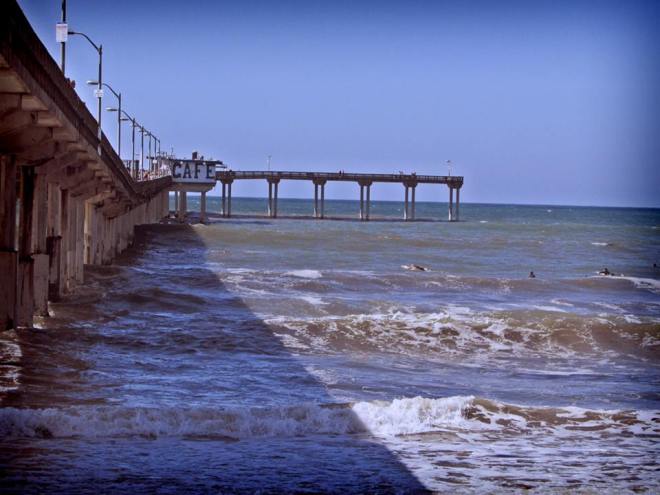
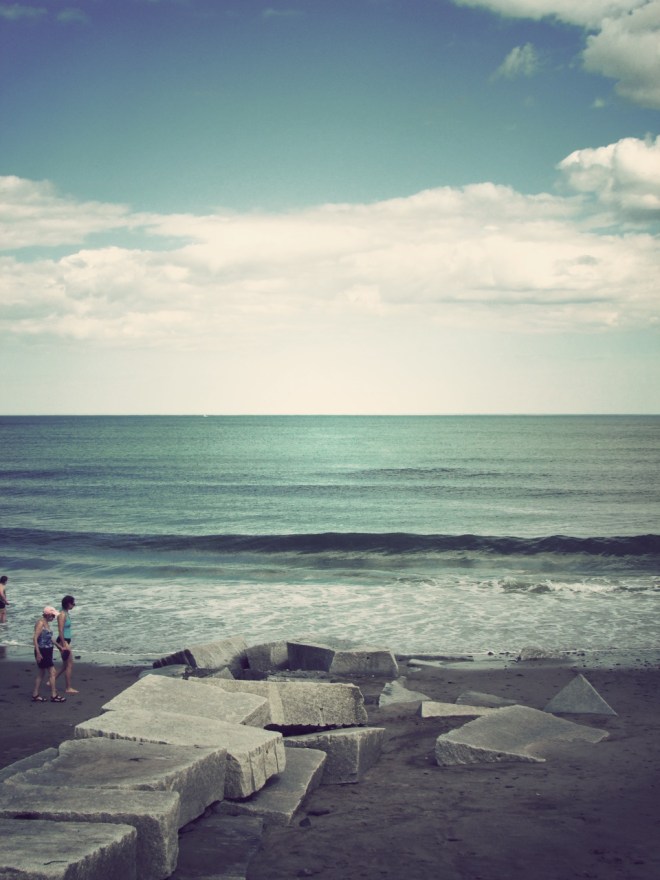
# 9: Ocean Beach, San Diego (September 27th)

This may not be the most complex photograph I’ve ever taken (I took it sitting down in the sand, after all,) but it’s one of my favorites from the year because it was taken during one of the most relaxing afternoons during one of my most relaxing vacations in recent memory. I was sitting in a small sliver of shade underneath the pier at Ocean Beach waiting for my friend Duncan to arrive while I listened to music and watched the surfers paddle out as the waves crashed in.

I could have stayed like that for hours. It was truly a little piece of paradise.

BestOf201318

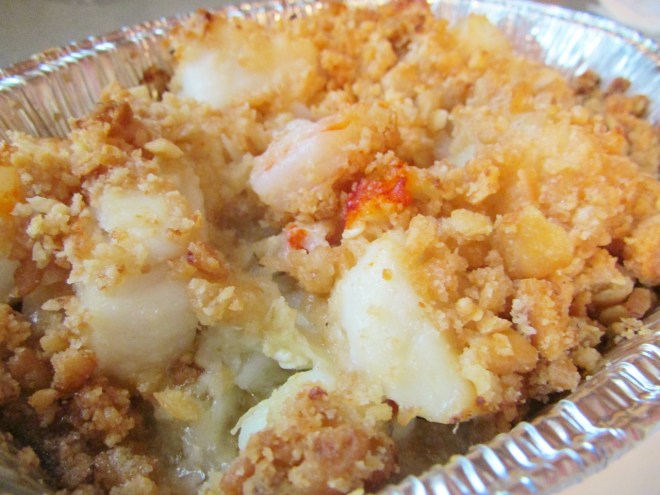
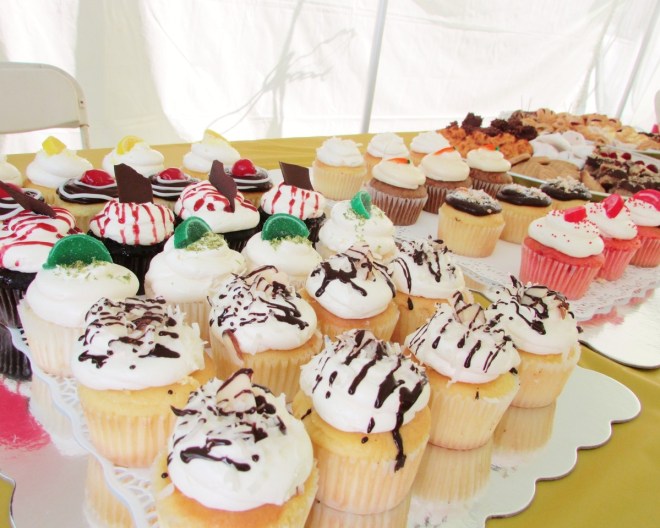
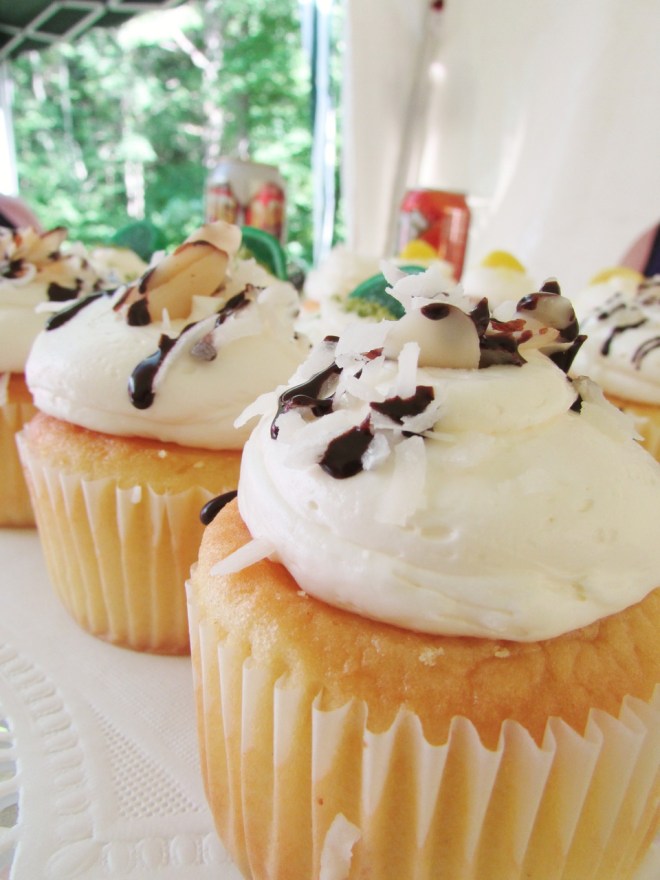
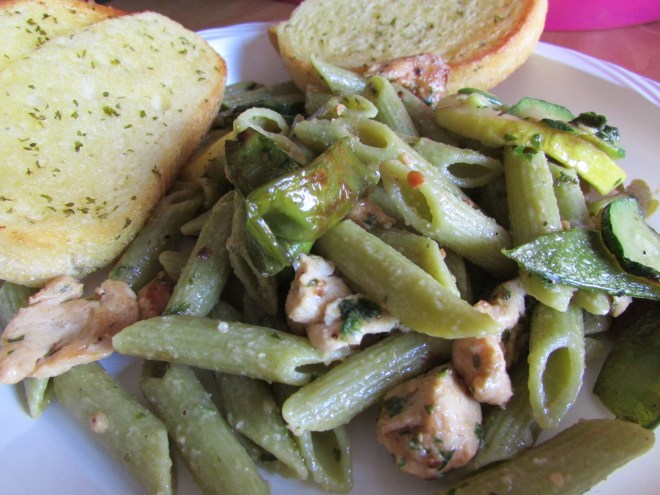
# 8: Red Velvet Cupcakes with Salted Caramel Frosting (January 22nd)

If there was ever a photograph I wanted to eat, the above shot of surprise cupcakes, a combination of two of my favorite flavors, that my family concocted and made for my birthday would be it. This picture apparently received a lot of attention on Pinterest among foodies and dessert-enthusiasts, which is pretty cool- but I especially liked it because it was a (delicious) reminder of how wonderful my relatives are and the effort they put into giving me a fun (and again, delicious,) surprise.

BestOf201317

# 7: Photobombing Norman Reedus in NYC (June 29th)

I can’t take credit for this photo, since I simply posed and a woman at Wizard World NYC caught the moment with her camera- but it’s still one of the best pictures I have from the event, and the year- although definitely not the most flattering. Norman Reedus, of “The Walking Dead” and “Boondock Saints” fame, is also a notorious photobomber. Having seen countless photos of fans simply standing beside him and looking timid or giddy, I decided to liven things up.

I gave Norman a heads up when we got ready to pose in front of the hilariously awkward K-Mart style backdrop, and he was an incredibly good sport and enthusiastic participant to the shenanigans. He’s a genuinely cool guy.

BestOf201316

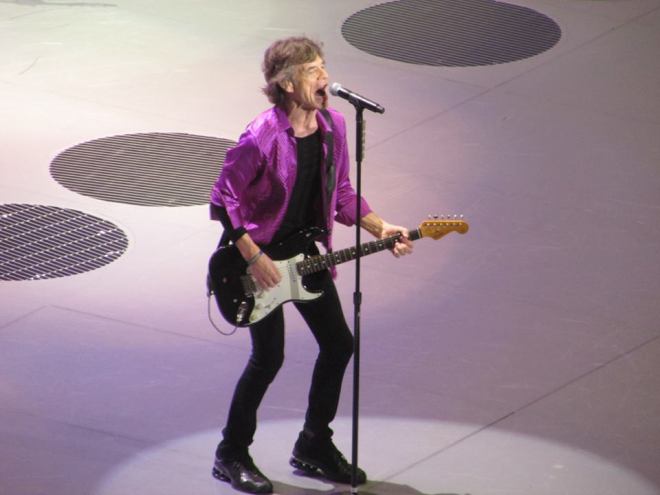
# 6: Mick Jagger, TD Garden (June 14th)

Winning Rolling Stones tickets was a dream come true that I’m still pinching myself about since I can’t believe it actually happened. To be able to see the man, the myth, the legend- Mick Jagger- sashay, dance, and kick his way around the stage- performing all the songs I grew up with and love so, so much- was beyond surreal. I took this shot in between cheering myself hoarse and singing along at the top of my lungs- and it’s an incredible memento to have in my collection of concert pictures from throughout the years.

BestOf201315

# 5: Autumn Shade, Winsor Dam (October 5th)

During one of my countless weekend drives, I had stopped in Western Massachusetts to take in the fresh air and beautiful fall foliage. It was during a long walk over the Winsor Dam in Ware/Belchertown when I saw the sun shining through this tree, in the midst of the transition from Summer to Fall- hanging over and shedding it’s leaves onto an unoccupied picnic table. I grabbed my camera, and the result is something I am really quite pleased with.

BestOf201314

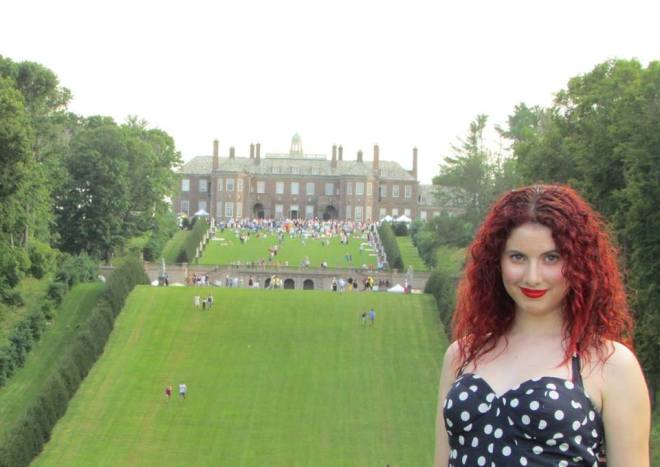
# 4: Great Gatsby Lawn Party at the Crane Estate (July 21st)

This is another photo I didn’t take myself (Sean helped!) but I loved it, even if it’s considered a “selfie.” We had considered taking this picture in black & white or sepia, to give it a more authentic “old time” feel, but in the end I’m glad we decided to keep the photo in it’s full color. The bright red of my hair and lipstick pales in comparison to the Crane Estate, surrounded by other attendees and the greenest grass I’d ever seen, looming in the background.

It was a beautiful party, and I’m glad I have this photo to remember it by.

BestOf201313

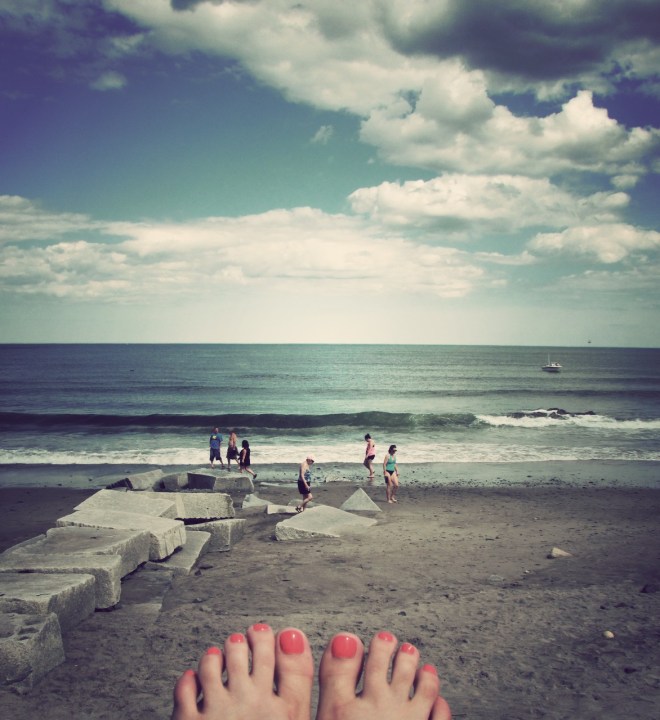
# 3: Cliff Walk, Newport (December 22nd)

This is one of the most recent photographs I’ve taken (from a day trip this past Sunday,) but it’s one of the most beautiful, in my opinion. The ocean has always been a place of refuge for me. It can be calming or exciting, perfect to sit and watch in any mood or mind set. On this particular day, it was wild- with waves crashing against the rocks while I strolled Cliff Walk. I took this photo of the water breaking against and inside a small cave within the cliff while some of the Newport Mansions are peeking through the fog in the background.

BestOf201312

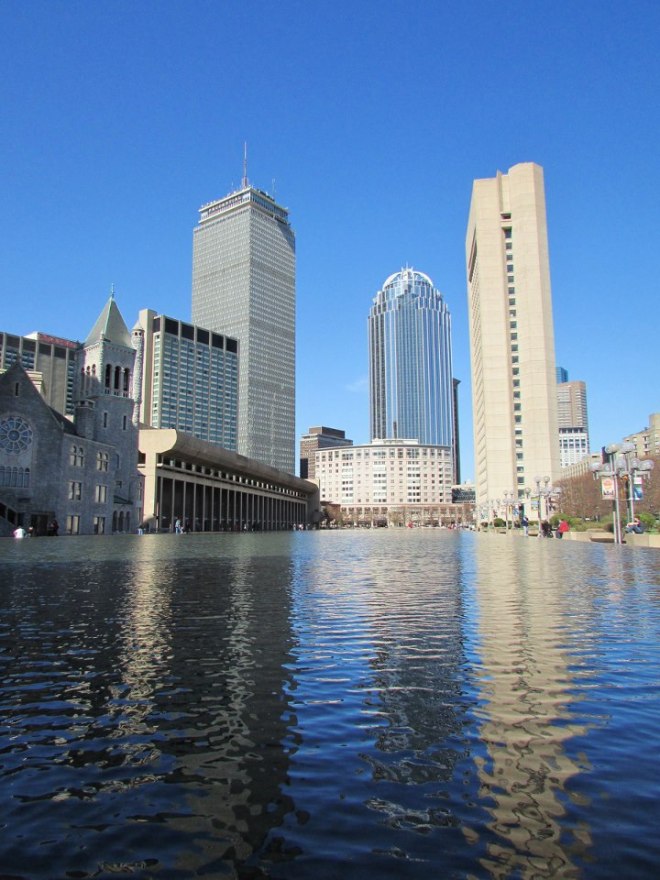
# 2: The Day After, Boston (April 20th)

At a glance, this photo isn’t anything extraordinary- there’s probably hundreds out there just like this- but to me- the date it was taken and the frame of mind myself and many others were in is what makes this photo so important to me. Shot hours after Dzhokhar Tsarnaev, one of the two Boston Marathon Bombers, was taken into custody- I snapped this photo by the reflecting pool while heading out to brunch with a friend. The sun was shining, there wasn’t a cloud in the sky, and everyone I saw or spoke to that day seemed to be in good spirits.

The city of Boston has never looked more beautiful to me than it did that day, and in this photograph.

BestOf201311

# 1: Medfield State Hospital (January 26th)

And finally, my favorite photograph. Something I captured that I am still, and will remain, very fond of. Taken on one of the coldest days of the year at the abandoned Medfield State Hospital, I was rounding one of the wards when I spotted this dilapidated bench with a tree growing through it. Although I am very pleased with every shot I took that day- this one is my favorite. I know there’s a metaphor in it somewhere, like “life continues through destruction and decay,” or something poetic like that- but I just thought this picture was neat. The snow, the boarded up building in the background, the fence. Every part of it.

I hope to go back someday in warmer weather and see the tree in bloom- still growing through the bench.

And there they are, my top 10 photographs from 2013. It was a hard decision to make, limiting all of my pictures I took down to just ten- but I think it’s a good compilation. All of the photos posted have fun or meaningfulness to them.

I hope to be even more of a shutterbug in 2014 (and who knows- maybe double my list to a “top 20” this time next year?)

My Holiday Essentials.

Leave a comment Standard

MyHolidayEssentials2013Logo

Every season, I try to do an “essentials” post of the things/products that are getting me through the changing weather, temperatures, travels and seasonal activities. With snow falling heavily as I write this, and having attempted on more than one occasion to get some Christmas shopping done over the past couple of weeks (side note: nearly finished!) I thought that I’d forgo a “Winter Essentials” post and create a more festive one, instead.

Here are the things that are currently getting me into the holiday spirit:

MyHolidayEssentials20131

1. Anything Gingerbread or Peppermint Scented: In November’s Sephora Holiday Haul, I had picked up two body washes from Philosophy – one in “Spiced Gingerbread Cookie,” and the other in “Peppermint Stick.” Those were just scratching at the surface of what I consider to be my two biggest scent-obsessions this time of year. Also included in my collection are the above-pictured products from Bath & Body Works. From left to right:

“Iced Gingerbread Antibacterial Hand Soap,” which I keep in the bathroom for guests and myself since it smells delicious.

“Twisted Peppermint Hand Cream.” This one stays in my purse. It’s a refreshing burst of mint fragrance that keeps my hands nice and moisturized without making them feel greasy.

“Iced Gingerbread Foaming Hand Sanitizer.” Another purse-product. This foam is pretty strong in terms of the scent, but it’s not harsh on hands the way other liquid/gel sanitizers can be. It absorbs quickly without drying my skin out.

Each time I get a whiff of any of these products, I feel especially cheery.

MyHolidayEssentials20132

2. Thermal Pajamas: There is nothing more comfortable than rocking a pair of thermal pajamas and fuzzy socks while wrapping Christmas presents and listening to some Bing Crosby and Perry Como holiday classics, or watching “Home Alone” or “National Lampoon’s Christmas Vacation.” The ones I’m wearing in the photo above, a long sleeve shirt and matching leggings combination, were a splurge from Victoria’s Secret, and worth every penny. They keep me warm and cozy, and I’m looking into buying another set (or two) really soon.

MyHolidayEssentials20133

MyHolidayEssentials20134

3. Peppermint Hot Chocolate: I’ve drastically cut back on my caffeine intake as of late (and by “cut back,” I mean I haven’t had any coffee at all in weeks,) which means my beloved peppermint mocha lattes at Starbucks are off limits. I’ve found solace in peppermint hot chocolate, however- which gives me the same great taste without the jitters. Starbucks will always be my favorite go-to for this drink (it’s served at the perfect temperature, and with those little dark chocolate curls they sprinkle in!) but making it at home is easier, less costly, and still tastes just as good.

I make my own in one of two ways- by either melting an actual peppermint stick in scalding hot cocoa and letting it cool before I enjoy it, or, if I’m in a rush to drink it- adding a splash of peppermint-flavored creamer to it to give it a minty kick. Sadly, I do not have those delicious dark chocolate curls- but I find crumbling a York Peppermint Pattie or an Andes Mint on top works just fine.

MyHolidayEssentials20135

4. A Festive Sweater: While ugly Christmas sweaters are pretty fun, sometimes it’s nice to just have a festive one- with no bells, fringe, sequins, or poof balls glued or sewn onto it- to wear around the house or to holiday gatherings without having to don a Santa hat to look Christmas-y. Enter this oversized “Home Alone” inspired sweater from BooHoo.com (special thanks to Imogen for showing me where to buy it!) that I plan on rocking to the office Christmas party later on this week. I’ve paired it with a basic black skirt and black tights in the photo above, and it matches my annual holiday manicure perfectly. Speaking of, this year’s nail art is snowflake inspired:

MyHolidayEssentials20136

“Holiday Essentials” not pictured: Sugar cookie eggnog, evening drives to look at Christmas lights/decorations, making individual and unique Christmas cards for friends and loved ones, sporadically tuning in to the 24-hour marathon of “A Christmas Story” throughout Christmas Day and knowing all of the lines no matter what scene you’re watching, Advent Calendars, setting up and decorating the tree- then trying to keep your pets from destroying it or knocking it over, the annual ‘Toys for Tots’ donation delivery, listening to Christmas music while curling up beside a crackling fire, seeing how excited (and sometimes better behaved) little kids get as Christmas Eve approaches, those Little Debbie Christmas Tree snack cakes that are so bad for you but so delicious at the same time, snow ball fights, the last minute gift shopping trip, and of course- visiting/spending time with family and friends.

What are some of your “Holiday Essentials?”

Friendsgiving 2013.

Comment 1 Standard

Friendsgiving20131

Friendsgiving20132

Friendsgiving20133

Friendsgiving20134

Friendsgiving20135

Every year around this time for the past few years, my friend Stef rounds up our ever expanding circle of friends for our annual “Friendsgiving” dinner at her apartment, which is basically a huge Thanksgiving-style meal- sans blood-relatives- before we all get swept up in the inevitable stress and mayhem that is the busy holiday season. Everyone brings a dish or two (I was on apple and pumpkin pie duty this year,) a bottle of wine and/or beer- and we all sit down together at a long table, stuff our faces, and nine times out of ten- get a little tipsy. This year’s celebration was particularly poignant, however, since it was Stef’s last Friendsgiving in her longtime apartment. She’s moving into a new condo elsewhere in the city this coming weekend.

It’s a tradition I look forward to every year. In my teens and up until my early twenties, my friends and I were inseparable. We spent pretty much every day together, mornings and well into the later hours of the night. Of course, as we got a little older, some of us started careers that demanded more of our time and attention, others started families that demanded even more of those things- and others moved away- some a town or two over and some across state lines. As we settled into adulthood, our daily adventures became more of a weekly/monthly sort of thing- so to be able to sit down, all together, and enjoy good food and each other’s company without worrying about our everyday responsibilities for a few hours- is truly a wonderful, and very fun thing.

Friendsgiving20136

Not wanting to be overdressed for what is typically a casual affair, I wore leggings and my new favorite oversized “festive” t-shirt, courtesy of HUMAN. Stef loves Hall & Oates, so I thought it would be appropriate. Unfortunately, it was freezing last night, so the additional layers were necessary.

Thanksgiving is, of course, a time to give thanks, and although I’m a couple of days early, let me take the opportunity to say how thankful I am for my friends- whether it be my life-long ones I spent time with last night, to the ones I see occasionally or the ones I don’t see nearly as often as I’d like, to those who live far away and/or overseas, or to the ones I talk to online almost every day about anything and everything- from Sephora addiction, to terrible horror movies, to how adorable Tom Hiddleston’s overall demeanor is, or to how traumatic this season of “The Walking Dead” is turning out to be.

And even to the friends I haven’t met yet- I’m thankful. I truly am. They all, YOU all- have helped me through so much in recent months and over the past couple of years with unyielding love, support, and humor- and there aren’t enough words or space on this blog of mine that could ever properly convey my gratitude. I cherish and love my friends, near and far, more than anything in this world. I am thankful for many, many things- but to be blessed with such good friendships is definitely at the top of the list.

xoxo

Quick Eats: Butternut Squash Ravioli

Leave a comment Standard

ButternutSquashRavioli1

It’s been a while since I’ve done a cooking/baking post for the blog, mostly because of my schedule and the majority of my meals being unremarkable (not that they’ve been bad, but they weren’t really worthy of their own post,) but tonight I put some time aside to plan dinner- and this post. I have to say that it feels really good to be back in the kitchen cooking up different things again and adding some variety & flavor to the mix. Butternut squash ravioli is a delicious and filling seasonal dish that is perfect for this time of year. My recipe comes in two parts, the ravioli itself and the sauce, and is also made from scratch- which results in the ravioli not looking perfectly squared and cut like the traditional store bought kind- but tasting 10x better.

YOU WILL NEED (RAVIOLI:)

* Immersion blender

* Rolling pin

* 1/2 Pre-peeled butternut squash (totaling 5 cups after being rinsed and cubed)

* 2 Cups chicken stock

* 2 Cups flour

* 4 Eggs

* 1/4 Teaspoon of olive oil

* 3 Tablespoons of butter

* 1/4 Cup of brown sugar

* 1/2 Cup of potato starch

* 1/4 Teaspoons of nutmeg

YOU WILL NEED (SAUCE:)

* 3 Tablespoons of butter

* 1/4 Cup of flower

* 16 oz. (1 pint) of light cream

* 1 Cube of chicken bouillon

* Shaved Parmesan cheese

* Pinches of salt, pepper, and nutmeg

OKAY, HERE’S WHAT YOU DO:

1. After rinsing and cubing the 5 cups worth of butternut squash, set it in 2 quarts of cold water and begin to boil on the stove. While the water is heating up, add the 2 cups of chicken stock. It’s going to take a little while for the squash to become soft and mushy, so you can work on making the dough for your pasta while you wait.

ButternutSquashRavioli2

2. Pour the two cups of flower on your baking surface. From there, add the 4 eggs, and begin mixing and kneading thoroughly until the dough begins to thicken in texture and consistency.

3. Add the 1/4 tablespoon of olive oil to the dough. Continue to knead. When the dough is thick and evenly mixed, rest a clean, damp cloth over it to keep it from drying out for about 10-15 minutes. Now you can focus on the squash again, which should be tender and ready to be strained by now.

4. After straining the squash and pouring it back into the pan, add the 3 tablespoons of butter, the 1/4 cup of brown sugar, and the 1/4 teaspoon of nutmeg to the squash- and begin pureeing with the immersion blender.

ButternutSquashRavioli3

5. After pureeing the mixture for a few minutes, add the 1/2 cup of potato starch and continue using the immersion blender to mix it into your butternut squash filling. This will keep it from being watery or runny when you put it into the pasta and cook it. Once you’re thoroughly mixed everything together and your pureed squash has a rich consistency, feel free to do a taste test to see whether or not you want more nutmeg- and add whatever you feel is an appropriate amount (I just mixed in a couple more pinches to add a little more flavor.)

6. It’s time to go back to the dough. After flouring your rolling pin, roll the dough flat and cut into four inch strips. From there, scoop spoonfuls of squash along the strips of dough.

ButternutSquashRavioli4

7. Fold the dough over the spoonfuls of squash, creating pockets, and cut them into squares. Use a fork or your fingertips to flatten the edges around the squares, keeping the butternut squash filling inside the pocket and giving the ravioli it’s shape.

8. Set raviolis on a floured baking pan, and let them sit for 10-15 minutes while you mix the sauce.

ButternutSquashRavioli5

9. Using another pan, melt the 3 tablespoons of butter and gradually add the 1/4 cup of flour  and the 16 oz. of light cream. Begin to stir/whisk the ingredients together.

10. Add the 1 cube of chicken bouillon to the mixture, as well as pinches of salt, pepper, and nutmeg. Continue to stir/whisk until the consistency of the sauce is nice and thick. *IF THE SAUCE BECOMES TOO HEAVY, YOU CAN THIN IT OUT BY ADDING A LITTLE MILK TO IT.*

ButternutSquashRavioli6

11. While letting your sauce simmer, you can now add your ravioli to a pot of boiling water to finish cooking. When it’s done, strain the excess water from the pan and add the sauce to the pasta- making sure each piece is generously coated.

12. Serve the ravioli with the shaved Parmesan cheese and pinches of nutmeg for added flavor.

13. Spoon ravioli into face.

ButternutSquashRavioli7

These ravioli tasted so, so good, and were absolutely worth the mini-mess I made in my kitchen with the flour and brown sugar while I was preparing them.

Quick Eats: Baked Seafood Casserole

Comments 13 Standard

Good afternoon!

I’m currently sitting at my desk waiting for my hair to dry and trying to accessorize for a themed lawn party I’m attending later on this afternoon at Castle Hill.

‘Til then, I thought I’d share a recipe for one of my all-time favorite dishes that I whipped up the other night for dinner. If you’re not a fan of seafood, then this isn’t the meal for you, but if you love it as much as I do- this won’t disappoint. My serving size was for four people, so the amount of ingredients and measurements may vary depending on how many portions you’re looking to cook.

Also, my apologies for not taking photos as I was cooking the casserole. I was in a bit of a rush and only had time to snap a couple of pictures of the finished product before I proceeded to stuff my face.

BakedSeafoodCasserole

YOU WILL NEED:

* 1 baking dish.

* 4 Individual tinfoil serving trays.

* 1 1/3 Tablespoons of butter.

* 1 1/3 Tablespoons of olive oil.

* 1 Can (18 2/3 ounces) of cream of mushroom soup.

* 2/3 lbs. of peeled shrimp.

* 2/3 lbs. of peeled scallops.

* 2/3 lbs. of cooked lobster meat.

* 1/3 Cup of chopped onion.

* 1 2/3 Cups of Ritz Cracker crumbs.

* 1 Lemon.

* Salt & pepper for flavoring.

Please note, I know some people like to add rice, mushrooms, celery, and different types of cheeses to their seafood casserole, and you absolutely can if you wish- but this recipe is more my personal preference.

OKAY, HERE’S WHAT YOU DO:

1. Melt the 1 1/3 tablespoons of butter in a frying pan, and then add the 1 1/3 tablespoons of olive oil.

2. Add 1/3 cup of chopped onion to the mixture and saute.

3.  Once onions are lightly sauteed, add the can of mushroom soup. Stir thoroughly.

4. When soup & onions are mixed evenly, remove from heat.

5. After buttering the baking dish, throw in the shrimp, scallops, and lobster meat. Feel free to mix them around so that they are spread out around the dish and not just lumped together in the middle.

6. Add your soup & onion mixture to the baking dish.

7. Sprinkle the Ritz Cracker crumbs on top.

8. Bake uncovered at 350°F for 45 minutes.

9. Scoop the portions of your seafood casserole into the individual tinfoil serving trays to keep them warm and mess-free.

10. Cutting the lemon into four wedges, garnish each dish with a slice- and add salt & pepper for a bit of extra flavoring.

11. DIG IN!

BakedSeafoodCasserole2

xx

Quick Eats: Turkey Reubens

Comments 2 Standard

TurkeyReuben1

I’m not a big meat eater. That’s not to say I consider myself a vegetarian or a vegan. I’ve tried both lifestyles in the past and I admire the dedication it takes to stay diligent with it. Unfortunately, it’s not something I can keep up with on a daily or permanent basis.  When it comes to being a carnivore, my usual preferences are seafood and the occasional serving of poultry. I don’t particularly like the taste of beef or pork, so these reubens (which I suppose could also be considered a fancier alternative to a simple grilled cheese sandwich, depending on how you look at it), made with freshly sliced turkey, are a nice substitute to corned beef. They’re quick and easy to make- and they taste delicious.

YOU WILL NEED:

* A griddle or frying pan.

* A spatula

* Challah bread (or rye, depending on personal preference.)

* Butter

* Thousand island dressing

* Sliced turkey (the amount may vary depending on how many people you’re serving/reubens you’re making. I had bought a half pound and still had plenty left over to last me for the next couple of days.)

* Sliced cheddar cheese.

* Coleslaw (or sauerkraut. Again, it depends on personal preference.)

TurkeyReuben2

OKAY, HERE’S WHAT YOU DO:

1. As your griddle/frying pan is warming up, butter one side of your sliced bread of choice, placing it buttered-side down to gradually grill. On the dry side of your bread, spread a little (or a lot of. Nobody’s judging you for it,) thousand island dressing around.

2. After you’ve got your thousand island dressing spread, layer a slice of cheddar cheese (you can do more than one, but I didn’t want it to taste too much like cheddar since there’s so many other flavors going on at once) and pile on your sliced turkey.

*NOTE* Per request, a couple of the sandwiches were made with sliced ham, instead- which explains the differences in color and texture in the meat pictured. I wasn’t using uncooked/expired/radioactive turkey or anything.

3. Once the desired cheese and meat amounts have been achieved, spoon a helping of coleslaw on top. You can use sauerkraut if you want, since that’s what typically goes on reubens, but personally I’m not a fan of the stuff, and I feel coleslaw gives the sandwich the tangy kick it needs- but with no weird aftertaste.

TurkeyReuben3

TurkeyReuben4

4. Grabbing another slice of bread, spread a little more butter on one side for even grilling. On the other side, spread more thousand island dressing. From there, press the bread- thousand island dressing-side down- on top of your coleslaw, meat, and cheese to sandwich everything together.

5. Using your spatula, continually press down and flip the sandwich on the griddle/frying pan until both sides are grilled to a crisp golden-brown. You want your slice of cheddar cheese to melt without getting too watery.

6. Remove the sandwich from the griddle/frying pan, let cool, and enjoy!

TurkeyReuben5

TurkeyReuben6

Typically I serve these reubens with a cup of soup or a small side salad. Fresh out of ingredients for either one at the time, however- I served them to some company with lightly salted, crisped potato wedges, instead.

Nobody seemed to mind. These sandwiches were a hit.

Dessert Cart.

Leave a comment Standard

DessertCart1

DessertCart2

DessertCart3

I swear to God I’m not THAT person who has to take pictures of every single meal or snack before they actually enjoy the taste of it, and I also want to stress that despite the fact that most of my food photos consist of cupcakes and sugary confections, I’m very much a healthy eater and I do actually consume nutritious meals outside of the dessert menu.

The photos above were some of the dessert selections from my cousin Paige’s graduation party/cookout last weekend. All of the cupcakes, brownies, cookies, and tarts just looked too pretty to eat on their serving trays that I couldn’t help but snap a couple of photos before I dug in.

Beach Bum.

Leave a comment Standard

LazyDayInHampton1

LazyDayInHampton2

LazyDayInHampton3

Just a few shots (one including my strange looking toes) from a drive to Hampton Beach I took this past Sunday afternoon. When I wasn’t perusing the surfboards, the shoes, and the bohemian style tops at Cinnamon Rainbows (my favorite surf shop), I was perched on one of the concrete walls by the water- taking in the sound of the waves, the salty air, and the sun on my face. Heavenly.

SpinachPenneDish

Also, it’s not so much a “Quick Eats” recipe post, but I just wanted to share that I absolutely love cooking the above-pictured spinach penne, chicken, and vegetables dish. It’s delicious, good for you- and so easy and fast to make.

You just need:

One package/box of spinach penne pasta

1/2 pound of chicken (cut into pieces)

1 thinly sliced yellow squash

A handful of fresh snap pea pods

And as much broccoli as you want.

While you’re boiling the spinach pasta, you simply sauté the cut chicken pieces, the thinly sliced pieces of yellow squash, the snap pea pods, and the broccoli in some olive oil until everything is cooked and crisp.

Strain the pasta, mix all the ingrediants together into your sauté pan, and voilà!

The dish I prepared was served with some freshly grated Parmesan cheese and garlic toast.

So yummy.