Pomp and Circumstance (and Cupcakes!)

Leave a comment Standard

PaigesGraduationCupcakes1

PaigesGraduationCupcakes2

PaigesGraduationInvitation

It’s weird to think that it’s been nearly a decade since I graduated high school. I was only recently reminded of this fact when one of my old friends invited me to join an online group consisting of the majority of my graduating glass so that we could better plan our impending 10-year reunion. Of course, my first reaction was to curl up into the fetal position  and sob nostalgic tears over how quickly time flies and how much older I’ve gotten, but it’s actually kind of cool to see how the people I used to spend almost every single day with for years have changed, what they’re up to, where they are, etc. High school wasn’t exactly a walk in the park all the time (I don’t think it really is for anyone- and whoever tells you that high school is the greatest years of your life are full of shit), but I did have some good times and made some good memories.

It was my cousin Paige’s turn to begin her post-high school journey this past Sunday when she graduated with high honors and a few scholarships under her belt for when she attends a prestigious university this Fall. Paige is like a sister to me. My parents had helped take care of her since she was a baby (and while I was still pretty young myself) while her own parents worked tirelessly, and there wasn’t a weekend getaway or vacation she didn’t come on with us. Homework assignments, sleepovers, family triumphs and tragedies, boy problems (mine a little more complex since I’m older)- Paige and I have stayed close through it all- and I am so, so unbelievably proud of her for all she’s accomplished so far and all the good she will further bring to the world as she continues her education and moves forward with her goals and aspirations.

I was honored to attend her ceremony and see her get her diploma after four years of very, very hard work.

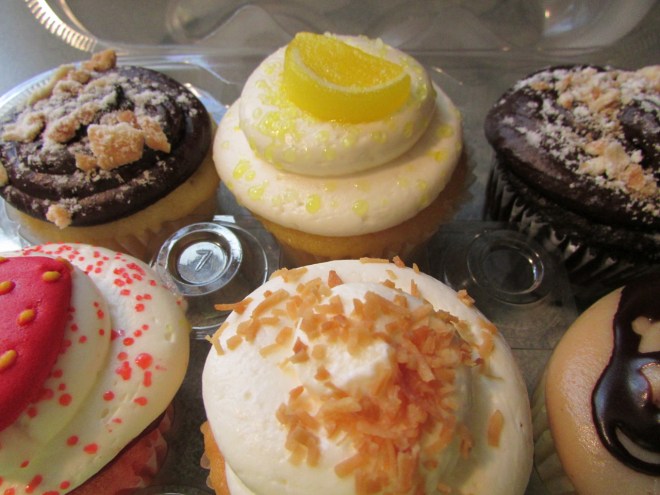
On Saturday, pre-graduation, her and I ran a few errands for her “HIGH SCHOOL IS FINALLY OVER!” party in a couple of weeks, including a stop, per her request, to order a few dozen cupcakes at Aunty Ellen’s Creative Confections in Leominster, which was a bit of a drive for me, but totally worth it once we arrived. Not only was the bakery very cute, but the staff were so friendly- and the cupcakes were delicious (we sampled the Boston cream and cannoli ones and OH MY GOD)- and carefully decorated.

I snapped those photos above of the half-dozen we ended up picking up for the ride home, which, as you can probably imagine, are now long gone.

Quick Eats: Chicken & Cheese Enchiladas

Leave a comment Standard

CCEnchiladas1

Tonight I decided to mix up my usual healthy regimen of pesto and/or vegetables and cook up some very cheesy, very filling chicken enchiladas. Fair warning: this recipe isn’t exactly the healthiest thing, and I wouldn’t recommend enjoying these on a regular basis, but once in a while- a special occasion, a “cheat day” if you’re dieting, or even just to satisfy a craving- won’t hurt. These are delicious, and if chicken isn’t your thing, it can be easily supplemented with tofu or grilled vegetables. I chose chicken since that seems to be the most popular.

YOU WILL NEED:

* 1 1/2 Pounds of boneless chicken.

* 1 Tablespoon of olive oil.

* 1 Cup (or one 10 ounce can) of enchilada sauce.

* 1 Package of soft flour tortillas (burrito size).

* 1 Pouch of four-cheese Mexican blend shredded cheese.

* 1/2 Cup of of Cheez-Whiz (NOT THE AEROSOL KIND. Make sure it’s the type in a jar!)

* 1 Container of sour cream.

CCEnchiladas2

OKAY, HERE’S WHAT YOU DO:

1. Cut up the boneless chicken into small, chewable pieces, and place them into a saute pan, adding the tablespoon of olive oil to help the chicken cook properly and evenly. From there, begin to saute your chicken until the pieces are slightly caramelized and crisp. You don’t want the chicken to be dried out, so be mindful that you don’t overcook them.

2. When the chicken is crisp, add the 1 cup (10 oz. can) of enchilada sauce and let simmer briefly.

3. After giving your chicken and sauce a good stirring, add 1/2 cup of Cheez-Whiz and mix thoroughly.

CCEnchiladas3

CCEnchiladas4

4. When everything is mixed, scoop the chicken onto your flour tortillas. Be sure to leave a little of the cheese & enchilada sauce mixture left in the saute pan. You’re going to use it again in a couple of minutes.

5. Pre-heat your oven to 350°F. While it’s heating up, fold your flour tortillas and carefully place them side by side in a baking pan. Once they’re sorted, spread the excess cheese & enchilada sauce mixture over the folded tortillas.

6. Sprinkle some of the four-cheese Mexican blend shredded cheese on top of the folded tortillas. Depending on how cheesy you want these to turn out, you can add as much as you want.

CCEnchiladas5

CCEnchiladas6

7. By now, your oven should have reached the necessary temperature. Take your baking pan jam-packed with enchiladas and bake for approximately 12-15 minutes in the oven- just enough time to melt the cheese and lightly toast the flour tortillas.

8. Remove the baking pan and enchiladas from the oven, let cool, and apply a generous amount of sour cream on top.

9. Garnish as desired (I used a little chopped parsley to add some green to an otherwise very orange looking dish before serving these.)

10. INTRODUCE ENCHILADAS TO STOMACH.

Like I said before, this meal isn’t super healthy, but it won’t cause any kind of irreversible damage if you have them once in a great while. There are ways to make them more fit-friendly, whether it be substituting certain ingredients or cutting portion sizes, but I thought this was a well-deserved treat.

CCEnchiladas7

Beetlejuice! Beetlejuice! Beetlejuice!

Leave a comment Standard

BeetlejuicePasta1

BeetlejuicePasta2

Sometimes all it takes is a little wild-colored pasta to turn an otherwise blasé meal into something fun. Such was the case the other night when I cooked up this black and white swirled all-natural bow tie pasta I had picked up at a farmers’ market a few weeks ago. There were a few other variations: checkered macaroni and rainbow spaghetti, for example, but these bow ties reminded me of the movie “Beetlejuice” and I just knew I had to cook them up.

A little butter and a pinch of salt, and voilà! Dinner was served. The pasta itself tasted fine. I think I’m going to try the rainbow spaghetti next time.

BeetlejuicePasta3

Baking Post: Pineapple Upside-Down Cake

Comment 1 Standard

PineappleUpsideDownCake1

For as long as I can remember, my mom always made “Pineapple Upside-Down Cake” for every holiday, family function, special occasion, etc. It was sort of like fruitcake- always just, there, on the table (except it was much, much tastier than a fruitcake)- but it’s always been a sort of tradition in her house.

I had a craving for it tonight, and decided to make one myself. The recipe is simple enough, and if you’ve got an hour or so, it’s a nice change from a standard scoop of ice cream or cookie for dessert.

YOU WILL NEED:

* Butter.

* Brown sugar.

* 1 Springform pan.

* 1 Box of yellow cake mix (the brand is entirely up to you- just make sure it’s yellow cake).

* 1 Can of sliced pineapples.

* 1 Jar of maraschino cherries.

PineappleUpsideDownCake2

OKAY, HERE’S WHAT YOU DO:

1. First, you are going to use butter to “grease” the bottom of your springform pan. Make sure it’s covered to avoid any sticking. If you’re not a fan of butter, any non-stick spray should do the trick.

2. Cover the bottom of the pan with the brown sugar. Don’t be stingy. You can use a lot and it won’t ruin the cake.

3. Place the pineapple slices on top of the brown sugar.

4. Place maraschino cherries in the center of each pineapple slice. From here, you can feel free to add more brown sugar on top of the pineapple slices and cherries.

PineappleUpsideDownCake3

PineappleUpsideDownCake4

PineappleUpsideDownCake5

5. Preheat your oven to 350°. While the oven is heating up, prepare your yellow cake mixture as instructed on the box.

6. Pour the mixed yellow cake batter on top of your brown sugar/pineapple/cherry concoction.

7. Place pan inside oven and bake for approximately 50 minutes-1 hour. Be sure to do the toothpick test every so often to make sure your cake is cooked all the way through.

8. When your cake is done baking in the oven, let it sit on a cooling rack for 10-15 minutes. *BE CAREFUL: THE BROWN SUGAR WILL BE REALLY HOT* Heed my warning- I learned that the hard way.

9.  Once cooled, flip your cake over onto a serving dish.

10. OPEN FOOD HOLE. SHOVE CAKE INSIDE.

PineappleUpsideDownCake6

PineappleUpsideDownCake7

It came out pretty good- at least good enough where I know my mom would be proud of my efforts- although I can’t say for sure that I’ll carry on her tradition of baking one for every gathering I have with family and friends.

It’d be kinda’ funny, though.

xx

Quick Eats: Baked Macaroni & Cheese

Leave a comment Standard

MacAndCheese1

I’m officially snowed in for the weekend (SNOWPOCALYPSE 2013!), and I physically CANNOT watch any more movies on Netflix. I just don’t have it in me. I had to take a break and get up to do something, anything, to pass the time.

Since I’m fortunate enough to still have power, I decided to bake a ton of macaroni & cheese- and document it!

*NOTE: I went a little overboard and made enough mac & cheese to serve a dozen people, or in my case, enough mac & cheese to last me a solid week and a half- so amounts and measurements may vary depending on how much of this stuff you want to bake.*

YOU WILL NEED:

* 2 1-lb. Boxes of penne pasta.

* 2 Quarts of 2% milk.

* 2 Quarts of light cream.

* 8 Cups of 4-cheese blend shredded cheese (Make sure the package DOES NOT contain mozzarella cheese!).

* 4 Large (or 8 small) Chicken bouillon cubes.

* 2 Cups potato chips.

* 2 Cups Plain bread crumbs.

* 1/2 Tablespoon of salt.

* 1/2 Tablespoon of pepper.

MacAndCheese2

MacAndCheese3

OKAY, HERE’S WHAT YOU DO:

1. Pour the 2 quarts of cream, the 2 quarts of milk, and the 8 cups of shredded cheese into a 5 quart pot and slowly bring to a boil while stirring.

2. As the sauce is boiling, gently crumble the chicken bouillon cubes into the mixture. Continue to stir.

3. As the cheese begins to melt and the cube crumbles dissolve, swap the spoon for a whisk, and whisk the mixture so it thickens as it continues to boil.

4. Add the 1/2 tablespoon of pepper. From here, if you so desire- you can add additional ingredients. I’ve heard of some people adding pieces of bacon, jalapeño pepper, bits of tomato, etc. Whatever you want! Just be sure to continue whisking the sauce to get it nice and thick.

*The sauce has to come to a boil, and not just while you’re stirring it. If you stop stirring and the sauce is not bubbling, it needs to be heated more*

5. When the sauce reaches a thick texture, let it simmer. You can now begin boiling water to pour the 2 pounds of penne pasta into. Add the 1/2 tablespoon of salt to give the pasta a little more flavor as it cooks.

MacAndCheese4

6. While your pasta cooks, and your sauce simmers, take the 2 cups of potato chips and the 2 cups of plain bread crumbs and HULK SMASH THEM TOGETHER into a bowl.

7. Preheat your oven to 350°.

8. When your pasta is done cooking (the goal is to still have some texture to it. Try not to let the penne get too soggy!), strain out the excess water and pour the pasta into a baking pan.

MacAndCheese5

9. Pour your sauce over the pasta and mix thoroughly. Try to get every piece of penne coated in the sauce.

10. Sprinkle, or shake, your crunchy chip & breadcrumb topping over the pasta and sauce.

11. When your oven is ready, heat for approximately 30 minutes. If you want your macaroni and cheese to be crunchier, heat for a little longer- roughly 45 minutes.

12. Carefully remove the baking pan from the oven and let cool.

13. SHOVEL MAC N’ CHEESE INTO MOUTH.

MacAndCheese6

The best part about making so much of this? I have enough of it left over to last me if I remain snowed in for any significant amount of time.

Quick Eats: Homemade Tomato Soup

Comment 1 Standard

TomatoSoup1

In case you haven’t heard by now, the Northeast, specifically Massachusetts, is due to get slammed with what is expected to be a record-breaking winter storm/blizzard in less than 24 hours. The estimate of snowfall amounts vary, but the last report, at least the last one that I’ve heard, says we could get more than three feet of snow over the course of tomorrow through Saturday afternoon.

Massachusetts has essentially come to a screeching halt in preparation for the worst, with state-wide school closures and public transit shutting down early. My office is closed tomorrow, and drivers have been ordered off the roads by noon- roughly the time the brunt of the storm is anticipated to hit.

I’ve got plenty of candles, blankets, DVDs, and laptop battery to get me through any potential power outages, so braving the mass hysteria at the markets today was (thankfully) not necessary, but all this talk of snow and ice and cold had me wanting to make something warm and comforting for dinner tonight- and there’s nothing more warm and comforting than homemade tomato soup.

 If you’ve got an hour, this recipe is so easy, and the result is, to me, a lot better than just heating up a can of Campbell’s Tomato Soup in the microwave for three minutes.

YOU WILL NEED:

* 1 Vidalia onion (“sweet” onion.)

* 2 Cans of whole tomatoes (I use Hunt’s brand.)

* 1/2 Quart of chicken stock.

* 8-10 Fresh basil leaves.

* 1/2 Quart of light cream.

* Sour Cream.

TomatoSoup2

OKAY, HERE’S WHAT YOU DO:

1. After slicing up the vidalia onion, pour all of your ingredients, EXCEPT the light cream & the sour cream (you use that near the end) into a 5 quart pot.

2. Bring the ingredients to a boil, and then let simmer for 1/2 hour. Stir occasionally.

3. Using a immersion hand blender, puree the ingredients inside the pot until thick in texture. *Be mindful to turn the blender off before you lift it out of your soup. Take my word for it- if you don’t- it goes everywhere.*

4. Add the 1/2 quart of light cream. Puree a little more with the immersion hand blender to mix the cream in thoroughly.

5. Simmer mixture for another 1/2 hour. Stir occasionally.

6. Pour, or spoon soup into small bowls or serving saucers. Garnish with a dollop of sour cream, a basil leaf, and any desired amount of salt and/or pepper.

7. Wrap yourself in fleece blanket, and enjoy!

TomatoSoup3

I love preparing the soup with the ingredients above because when it’s done, it doesn’t taste like you’re just eating bland liquefied tomatoes. It has a really nice, warm, full flavor to it. Perfect for apocalyptic snowy days.

To all my friends reading this in Massachusetts- stay off the roads, stay bundled up, and stay safe. I’ll see you all when the storm is over and after I tunnel my way out my front door.

Baking Post: Salted Caramel Cupcakes

Comments 3 Standard

RedVelvetSaltedCaramelCupcakes

Yesterday was my birthday, and was celebrated in a quiet, low-key fashion. I worked most of the day, and spent most of the evening with my mom and some of my relatives at her house. It was nice.

Knowing my love of all things red velvet, which is only matched by my love of all things salted caramel, my mom, aunt, uncle, and cousin all teamed up to create the above-pictured “Red Velvet & Salted Caramel Cupcakes” in lieu of a traditional birthday cake for me. They were DELICIOUS, and I borrowed the recipe from my aunt to share with any foodies who may read this blog, or for anyone who is just interested in attempting to bake something new:

YOU WILL NEED:

* One box cake mix, and the ingredients to bake it (eggs, flour, milk, etc.) It can be any kind of cake mix, depending on your preference.

* Sea salt.

* 4-5 Heath Bars (Butterfinger bars are also a good substitute)

* Caramel ice cream topping

* Buttercream icing

* Squeeze bottle

OKAY, HERE’S WHAT YOU DO:

1. Bake your cupcakes according to the package directions.

2. When the cupcakes are nearly done baking, pour the caramel ice cream topping into a measuring cup.

3. Add 1/2 tablespoon of sea salt per 8 ox. of caramel. You may have to add a little more, depending on how salty you want them to taste.

4. Warm the mixture in the microwave for one minute, and then stir well. From there, pour the mixture into the squeeze bottle.

5. When the cupcakes are done baking, use the squeeze bottle to inject the mixture into the center of the cupcakes. Be sure to save some of the mixture for later! When all of the cupcakes have been filled, move them to a cooling area.

6. Keeping the Heath (or Butterfinger) bars in their packaging, HULK SMASH ‘EM INTO BITS. When you’re done, unwrap them and pour the pieces into a bowl.

7. When the cupcakes are cooled, frost them with the buttercream icing, sprinkle them (or dunk them) into the broken up Heath/Butterfinger bits, and drizzle more of the salted caramel mixture over them.

8. SHOVE CUPCAKES INTO MOUTH.

The sweetness of the red velvet cake, the salted caramel filling, and the broken up bits of Butterfinger made for an unexpected and pretty awesome flavor combination. Definitely one I never would have thought of before.

Before I wrap this entry up: many, many thanks to everyone who sent birthday wishes and kind words yesterday! It really meant a lot. I love you all and I had a great day!

BirthdayCardFromMom

And can we all just stop for a moment and appreciate this birthday card my mom gave me? Holy shit.