Quick Eats: Carol’s Cookies

Comment 1 Standard

CarolsCookies01

It’s hard to believe that in just a few short weeks, the season five finale of “The Walking Dead” will air and undoubtedly bring a week’s worth of misery following it’s ending (after an extension to 90 minutes instead of just it’s usual hour-long time slot.)

It’s been a bizarre season thus far, to say the least- and one I will pick apart following the finale once I’ve wrapped my head around whatever direction it looks like the sixth season will be heading in- but one thing I’ve enjoyed immensely is watching the character development of former battered housewife turned bad ass assassin turned even more bad ass spy Carol Peletier over these past few episodes. This season has, without question, belonged to Carol and her rise to leadership and full-on “Flawless Queen” status (right alongside Michonne.)

In a recent episode, Carol- playing possum while trying to feel out the new community of Alexandria and it’s residents to determine whether they are friend or foe- sweetly shares a cookie recipe with the head of the community’s pantry in which she supplements eggs with applesauce.

The good folks over at AMC, knowing that people might want to try this in their own kitchen, put together a helpful recipe card for quick reference- and having done a post inspired by the “Walter Mitty” clementine cake not too long ago- I decided to make my own Carol Cookies and share the results!

CarolsCookiesRecipe

The only part of the recipe I changed was the 1/4 cup shortening (because I find it gross,) where I substituted butter, instead.

The cookies baked incredibly easy and tasted surprisingly delicious- like crispy chocolate chip cookies without the actual chips in them. I plan on making these again for the finale, and might even wear a hideous floral printed cardigan when I do- just like Carol.

CarolsCookies03

CarolsCookies04

CarolsCookies02

Quick Eats: Tomato and Mozzarella Sliders

Leave a comment Standard

MozzarellaSliders1

Sunday is my “cheat day” in a weekly regimen of healthy eating. I snack on chips and sweets, or slurp down a Starbucks frappuccino. It’s a nice break before I dive back into the work week come Monday morning, and it gives me something to look forward to by, say, Thursday night when I don’t want to even glance at another fruit or vegetable ever again. Sunday’s snacking/sugar overload is like a reward to myself for making smart, beneficial nutrition choices all week- and it actually encourages me to stick to my long-term diet and fitness plan.

Sunday nights are especially fun, however, as it’s a bit of a tradition to whip up a snack to munch on during new episodes of “The Walking Dead” (bonus points if you don’t gag on your food during an especially gory scene.)  I’ve made tacos, onion rings, shrimp cocktail, etc., over the past couple of seasons, and last night- with a new episode getting closer and closer to airing, I wanted to make something really quick, REALLY easy, and relatively mess-free. These tomato and mozzarella sliders were the first thing to come to mind.

I love these so much that I decided to make a post for anyone who wanted to try them at their next TV viewing party- or just a party in general. They’re a great appetizer and only take about a half hour to prepare and bake.

MozzarellaSliders2

YOU WILL NEED: (*PLEASE NOTE – I didn’t give specific measurement amounts because it varies on the amount of people you’re serving. I prepared enough sliders for two people last night and only used a fraction of these ingredients. Obviously, if you’re serving more people- you will need more.*)

* Olive oil

* Split-top rolls (baguettes work, too!)

* Plum tomatoes

* Package of mozzarella cheese (whether or not it’s pre-sliced is entirely up to you.)

* Fresh basil (minced.)

* 1 Baking pan lined with tin foil.

OKAY, HERE’S WHAT YOU DO:

1. Pre-heat your oven to 350° – 375°, depending on how quickly you want these sliders to cook and how crispy you want them to be.

2. While the oven is heating, slice the split-top rolls width-wise to desired thickness. Place the bread slices flat on the baking pan lined with tin foil.

3. Drizzle a small amount of olive oil onto the slices of bread.

4. Slicing the mozzarella (again- to desired thickness,) place the slice on top of the bread and olive oil. If mozzarella is pre-sliced, simply grab a slice and place it on top. Use more than one slice if you want a thicker amount of melted cheese.

MozzarellaSliders3

MozzarellaSliders4

5. Just like the mozzarella, slice a clean plum tomato width-wise, and place slices on top of the cheese.

6. Using a tablespoon (or a squeeze bottle/tube) add minced basil on top of tomato. Drizzle another small amount of olive oil on top of basil.

7. Carefully place the baking pan in the oven, and cook until the mozzarella has started to melt. (It took about ten minutes for last night’s batch.)

8. Remove the pan from the oven, briefly let the sliders cool to avoid painful tongue-burning, and enjoy!

You can stack these sliders however you wish, too. It’s really one of those “all about preference” sort of snacks that can be mixed and prepared in a variety of ways. This is just the way I, personally, like them.

And luckily, last night’s episode of “The Walking Dead” was more stressful than it was gross- so I was able to enjoy these without dry-heaving.

xo

MozzarellaSliders5

Quick Eats: Homemade Crab Rangoon

Comments 4 Standard

CrabRangoon1

Growing up, ordering Chinese food was always reserved for Christmas Eve and New Years Eve, the two nights out of the year when my mother didn’t want to go anywhere near the kitchen and when most restaurants closed early. We’d sit around our Christmas tree (and on New Years Eve- the television- to watch the ball drop in Times Square,) stuffing our faces with chicken fingers, pork-fried rice, beef teriyaki, etc. and then chow down on the leftovers the following day.

In my early twenties, ordering Chinese food, while still a family tradition, became synonymous with last call at the local bars. We’d place a pick-up order while we finished our final drinks for the night, walk downtown to pick up the food, and nine times out of ten- eat almost all of it while walking to whoever’s apartment we were crashing at for the night. Nothing hit the spot after a couple of whiskey sours than a heaping serving of chicken lo mein.

And now, a few years older, ordering Chinese food (still a Christmas Eve tradition at my mom’s house!) often results in me getting a stomach ache and asking myself how I was able to eat the gigantic portions of it like I did when I was a kid. The only thing that doesn’t seem to make me feel gross after mass consumption is crab rangoon, a long-standing favorite on any take-out menu.

Instead of shelling out money for an order of crab rangoon at one of the many Chinese food places by where I live, I decided to make my own this afternoon. To me, it’s a sort trial and error type of recipe to attempt- but they came out pretty good- if I do say so myself!

CrabRangoon2

CrabRangoon3

CrabRangoon4

YOU WILL NEED:

* 1 Can of bulk crab meat

* 1/2 Brick/package of cream cheese (THIS CAN VARY. The last time these were made, only a small amount of cream cheese was added, and the result, while good- didn’t really taste like traditional rangoon. Depending on your preference, you can add more or less cream cheese. I prefer a little more.)

* 1 Package of won ton wraps (I found mine in the produce section at my local market)

* 1 1/2- 2 Cups of cooking oil

* 1/2 Freshly sliced lemon (or a teaspoon of lemon juice)

* 1 Egg – beaten

* A pastry brush

OKAY, HERE’S WHAT YOU DO:

1. Using a bowl, thoroughly mix the can of bulk crab meat and the 1/2 brick of cream cheese. I find using a fork to mash the ingredients together is helpful. From there, squeeze the 1/2 of freshly sliced lemon over the crab meat and cream cheese (or add the teaspoon of lemon juice) and continue mixing. Add salt and pepper for seasoning.

CrabRangoon5

2. In a pan, add the 1 1/2 cups – 2 cups of oil. Begin heating the oil on your stove top at medium/high.

3. While the oil is heating, lay out the won ton wraps out on a flat surface. Add a teaspoon of the crab/cream cheese/lemon juice mixture in the center of each wrap.

4. Using a pastry brush, dip the brush tip into your beaten egg, and sweep along each edge of the won ton wrap. This allows the edges to stick and stay together when you fold them, and prevents them from breaking apart when you cook them in the oil shortly.

CrabRangoon6

5. Fold together each corner of the won ton wrapper, creating a pocket. By now, your oil should be hot and ready to use.

6. Carefully drop the pockets into the oil. They’ll immediately begin to sizzle as they cook. Using a spatula, you can turn the pockets over in the oil to make sure they’re crisping and browning evenly. Once they reach your desired level of crispiness, use the spatula to remove them from the oil.

CrabRangoon7

CrabRangoon8

7. Set your cooked pockets on folded paper towels to absorb excess oil and allow them to cool.

8. Enjoy! (Chopsticks optional.)

CrabRangoon9

CrabRangoon10

These tasted so delicious- even better than the ones I’ve had in take-out orders in the past. I think the next time my family gets together for the holidays, I’ll whip up a batch of these to switch up our tradition- just a little bit.

Quick Eats: Butternut Squash Ravioli

Leave a comment Standard

ButternutSquashRavioli1

It’s been a while since I’ve done a cooking/baking post for the blog, mostly because of my schedule and the majority of my meals being unremarkable (not that they’ve been bad, but they weren’t really worthy of their own post,) but tonight I put some time aside to plan dinner- and this post. I have to say that it feels really good to be back in the kitchen cooking up different things again and adding some variety & flavor to the mix. Butternut squash ravioli is a delicious and filling seasonal dish that is perfect for this time of year. My recipe comes in two parts, the ravioli itself and the sauce, and is also made from scratch- which results in the ravioli not looking perfectly squared and cut like the traditional store bought kind- but tasting 10x better.

YOU WILL NEED (RAVIOLI:)

* Immersion blender

* Rolling pin

* 1/2 Pre-peeled butternut squash (totaling 5 cups after being rinsed and cubed)

* 2 Cups chicken stock

* 2 Cups flour

* 4 Eggs

* 1/4 Teaspoon of olive oil

* 3 Tablespoons of butter

* 1/4 Cup of brown sugar

* 1/2 Cup of potato starch

* 1/4 Teaspoons of nutmeg

YOU WILL NEED (SAUCE:)

* 3 Tablespoons of butter

* 1/4 Cup of flower

* 16 oz. (1 pint) of light cream

* 1 Cube of chicken bouillon

* Shaved Parmesan cheese

* Pinches of salt, pepper, and nutmeg

OKAY, HERE’S WHAT YOU DO:

1. After rinsing and cubing the 5 cups worth of butternut squash, set it in 2 quarts of cold water and begin to boil on the stove. While the water is heating up, add the 2 cups of chicken stock. It’s going to take a little while for the squash to become soft and mushy, so you can work on making the dough for your pasta while you wait.

ButternutSquashRavioli2

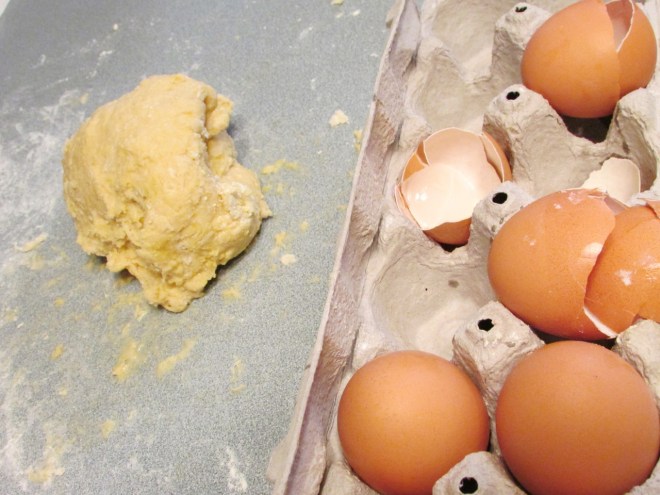
2. Pour the two cups of flower on your baking surface. From there, add the 4 eggs, and begin mixing and kneading thoroughly until the dough begins to thicken in texture and consistency.

3. Add the 1/4 tablespoon of olive oil to the dough. Continue to knead. When the dough is thick and evenly mixed, rest a clean, damp cloth over it to keep it from drying out for about 10-15 minutes. Now you can focus on the squash again, which should be tender and ready to be strained by now.

4. After straining the squash and pouring it back into the pan, add the 3 tablespoons of butter, the 1/4 cup of brown sugar, and the 1/4 teaspoon of nutmeg to the squash- and begin pureeing with the immersion blender.

ButternutSquashRavioli3

5. After pureeing the mixture for a few minutes, add the 1/2 cup of potato starch and continue using the immersion blender to mix it into your butternut squash filling. This will keep it from being watery or runny when you put it into the pasta and cook it. Once you’re thoroughly mixed everything together and your pureed squash has a rich consistency, feel free to do a taste test to see whether or not you want more nutmeg- and add whatever you feel is an appropriate amount (I just mixed in a couple more pinches to add a little more flavor.)

6. It’s time to go back to the dough. After flouring your rolling pin, roll the dough flat and cut into four inch strips. From there, scoop spoonfuls of squash along the strips of dough.

ButternutSquashRavioli4

7. Fold the dough over the spoonfuls of squash, creating pockets, and cut them into squares. Use a fork or your fingertips to flatten the edges around the squares, keeping the butternut squash filling inside the pocket and giving the ravioli it’s shape.

8. Set raviolis on a floured baking pan, and let them sit for 10-15 minutes while you mix the sauce.

ButternutSquashRavioli5

9. Using another pan, melt the 3 tablespoons of butter and gradually add the 1/4 cup of flour  and the 16 oz. of light cream. Begin to stir/whisk the ingredients together.

10. Add the 1 cube of chicken bouillon to the mixture, as well as pinches of salt, pepper, and nutmeg. Continue to stir/whisk until the consistency of the sauce is nice and thick. *IF THE SAUCE BECOMES TOO HEAVY, YOU CAN THIN IT OUT BY ADDING A LITTLE MILK TO IT.*

ButternutSquashRavioli6

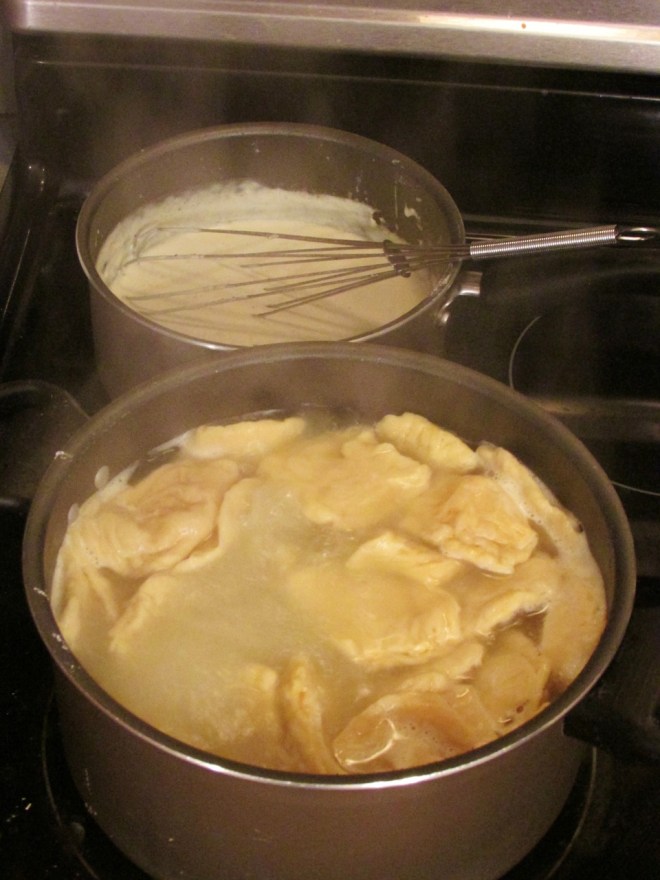
11. While letting your sauce simmer, you can now add your ravioli to a pot of boiling water to finish cooking. When it’s done, strain the excess water from the pan and add the sauce to the pasta- making sure each piece is generously coated.

12. Serve the ravioli with the shaved Parmesan cheese and pinches of nutmeg for added flavor.

13. Spoon ravioli into face.

ButternutSquashRavioli7

These ravioli tasted so, so good, and were absolutely worth the mini-mess I made in my kitchen with the flour and brown sugar while I was preparing them.

Quick Eats: Baked Seafood Casserole

Comments 11 Standard

Good afternoon!

I’m currently sitting at my desk waiting for my hair to dry and trying to accessorize for a themed lawn party I’m attending later on this afternoon at Castle Hill.

‘Til then, I thought I’d share a recipe for one of my all-time favorite dishes that I whipped up the other night for dinner. If you’re not a fan of seafood, then this isn’t the meal for you, but if you love it as much as I do- this won’t disappoint. My serving size was for four people, so the amount of ingredients and measurements may vary depending on how many portions you’re looking to cook.

Also, my apologies for not taking photos as I was cooking the casserole. I was in a bit of a rush and only had time to snap a couple of pictures of the finished product before I proceeded to stuff my face.

BakedSeafoodCasserole

YOU WILL NEED:

* 1 baking dish.

* 4 Individual tinfoil serving trays.

* 1 1/3 Tablespoons of butter.

* 1 1/3 Tablespoons of olive oil.

* 1 Can (18 2/3 ounces) of cream of mushroom soup.

* 2/3 lbs. of peeled shrimp.

* 2/3 lbs. of peeled scallops.

* 2/3 lbs. of cooked lobster meat.

* 1/3 Cup of chopped onion.

* 1 2/3 Cups of Ritz Cracker crumbs.

* 1 Lemon.

* Salt & pepper for flavoring.

Please note, I know some people like to add rice, mushrooms, celery, and different types of cheeses to their seafood casserole, and you absolutely can if you wish- but this recipe is more my personal preference.

OKAY, HERE’S WHAT YOU DO:

1. Melt the 1 1/3 tablespoons of butter in a frying pan, and then add the 1 1/3 tablespoons of olive oil.

2. Add 1/3 cup of chopped onion to the mixture and saute.

3.  Once onions are lightly sauteed, add the can of mushroom soup. Stir thoroughly.

4. When soup & onions are mixed evenly, remove from heat.

5. After buttering the baking dish, throw in the shrimp, scallops, and lobster meat. Feel free to mix them around so that they are spread out around the dish and not just lumped together in the middle.

6. Add your soup & onion mixture to the baking dish.

7. Sprinkle the Ritz Cracker crumbs on top.

8. Bake uncovered at 350°F for 45 minutes.

9. Scoop the portions of your seafood casserole into the individual tinfoil serving trays to keep them warm and mess-free.

10. Cutting the lemon into four wedges, garnish each dish with a slice- and add salt & pepper for a bit of extra flavoring.

11. DIG IN!

BakedSeafoodCasserole2

xx

Quick Eats: Turkey Reubens

Comments 2 Standard

TurkeyReuben1

I’m not a big meat eater. That’s not to say I consider myself a vegetarian or a vegan. I’ve tried both lifestyles in the past and I admire the dedication it takes to stay diligent with it. Unfortunately, it’s not something I can keep up with on a daily or permanent basis.  When it comes to being a carnivore, my usual preferences are seafood and the occasional serving of poultry. I don’t particularly like the taste of beef or pork, so these reubens (which I suppose could also be considered a fancier alternative to a simple grilled cheese sandwich, depending on how you look at it), made with freshly sliced turkey, are a nice substitute to corned beef. They’re quick and easy to make- and they taste delicious.

YOU WILL NEED:

* A griddle or frying pan.

* A spatula

* Challah bread (or rye, depending on personal preference.)

* Butter

* Thousand island dressing

* Sliced turkey (the amount may vary depending on how many people you’re serving/reubens you’re making. I had bought a half pound and still had plenty left over to last me for the next couple of days.)

* Sliced cheddar cheese.

* Coleslaw (or sauerkraut. Again, it depends on personal preference.)

TurkeyReuben2

OKAY, HERE’S WHAT YOU DO:

1. As your griddle/frying pan is warming up, butter one side of your sliced bread of choice, placing it buttered-side down to gradually grill. On the dry side of your bread, spread a little (or a lot of. Nobody’s judging you for it,) thousand island dressing around.

2. After you’ve got your thousand island dressing spread, layer a slice of cheddar cheese (you can do more than one, but I didn’t want it to taste too much like cheddar since there’s so many other flavors going on at once) and pile on your sliced turkey.

*NOTE* Per request, a couple of the sandwiches were made with sliced ham, instead- which explains the differences in color and texture in the meat pictured. I wasn’t using uncooked/expired/radioactive turkey or anything.

3. Once the desired cheese and meat amounts have been achieved, spoon a helping of coleslaw on top. You can use sauerkraut if you want, since that’s what typically goes on reubens, but personally I’m not a fan of the stuff, and I feel coleslaw gives the sandwich the tangy kick it needs- but with no weird aftertaste.

TurkeyReuben3

TurkeyReuben4

4. Grabbing another slice of bread, spread a little more butter on one side for even grilling. On the other side, spread more thousand island dressing. From there, press the bread- thousand island dressing-side down- on top of your coleslaw, meat, and cheese to sandwich everything together.

5. Using your spatula, continually press down and flip the sandwich on the griddle/frying pan until both sides are grilled to a crisp golden-brown. You want your slice of cheddar cheese to melt without getting too watery.

6. Remove the sandwich from the griddle/frying pan, let cool, and enjoy!

TurkeyReuben5

TurkeyReuben6

Typically I serve these reubens with a cup of soup or a small side salad. Fresh out of ingredients for either one at the time, however- I served them to some company with lightly salted, crisped potato wedges, instead.

Nobody seemed to mind. These sandwiches were a hit.

Quick Eats: Chicken & Cheese Enchiladas

Leave a comment Standard

CCEnchiladas1

Tonight I decided to mix up my usual healthy regimen of pesto and/or vegetables and cook up some very cheesy, very filling chicken enchiladas. Fair warning: this recipe isn’t exactly the healthiest thing, and I wouldn’t recommend enjoying these on a regular basis, but once in a while- a special occasion, a “cheat day” if you’re dieting, or even just to satisfy a craving- won’t hurt. These are delicious, and if chicken isn’t your thing, it can be easily supplemented with tofu or grilled vegetables. I chose chicken since that seems to be the most popular.

YOU WILL NEED:

* 1 1/2 Pounds of boneless chicken.

* 1 Tablespoon of olive oil.

* 1 Cup (or one 10 ounce can) of enchilada sauce.

* 1 Package of soft flour tortillas (burrito size).

* 1 Pouch of four-cheese Mexican blend shredded cheese.

* 1/2 Cup of of Cheez-Whiz (NOT THE AEROSOL KIND. Make sure it’s the type in a jar!)

* 1 Container of sour cream.

CCEnchiladas2

OKAY, HERE’S WHAT YOU DO:

1. Cut up the boneless chicken into small, chewable pieces, and place them into a saute pan, adding the tablespoon of olive oil to help the chicken cook properly and evenly. From there, begin to saute your chicken until the pieces are slightly caramelized and crisp. You don’t want the chicken to be dried out, so be mindful that you don’t overcook them.

2. When the chicken is crisp, add the 1 cup (10 oz. can) of enchilada sauce and let simmer briefly.

3. After giving your chicken and sauce a good stirring, add 1/2 cup of Cheez-Whiz and mix thoroughly.

CCEnchiladas3

CCEnchiladas4

4. When everything is mixed, scoop the chicken onto your flour tortillas. Be sure to leave a little of the cheese & enchilada sauce mixture left in the saute pan. You’re going to use it again in a couple of minutes.

5. Pre-heat your oven to 350°F. While it’s heating up, fold your flour tortillas and carefully place them side by side in a baking pan. Once they’re sorted, spread the excess cheese & enchilada sauce mixture over the folded tortillas.

6. Sprinkle some of the four-cheese Mexican blend shredded cheese on top of the folded tortillas. Depending on how cheesy you want these to turn out, you can add as much as you want.

CCEnchiladas5

CCEnchiladas6

7. By now, your oven should have reached the necessary temperature. Take your baking pan jam-packed with enchiladas and bake for approximately 12-15 minutes in the oven- just enough time to melt the cheese and lightly toast the flour tortillas.

8. Remove the baking pan and enchiladas from the oven, let cool, and apply a generous amount of sour cream on top.

9. Garnish as desired (I used a little chopped parsley to add some green to an otherwise very orange looking dish before serving these.)

10. INTRODUCE ENCHILADAS TO STOMACH.

Like I said before, this meal isn’t super healthy, but it won’t cause any kind of irreversible damage if you have them once in a great while. There are ways to make them more fit-friendly, whether it be substituting certain ingredients or cutting portion sizes, but I thought this was a well-deserved treat.

CCEnchiladas7

Beetlejuice! Beetlejuice! Beetlejuice!

Leave a comment Standard

BeetlejuicePasta1

BeetlejuicePasta2

Sometimes all it takes is a little wild-colored pasta to turn an otherwise blasé meal into something fun. Such was the case the other night when I cooked up this black and white swirled all-natural bow tie pasta I had picked up at a farmers’ market a few weeks ago. There were a few other variations: checkered macaroni and rainbow spaghetti, for example, but these bow ties reminded me of the movie “Beetlejuice” and I just knew I had to cook them up.

A little butter and a pinch of salt, and voilà! Dinner was served. The pasta itself tasted fine. I think I’m going to try the rainbow spaghetti next time.

BeetlejuicePasta3

Quick Eats: Baked Macaroni & Cheese

Leave a comment Standard

MacAndCheese1

I’m officially snowed in for the weekend (SNOWPOCALYPSE 2013!), and I physically CANNOT watch any more movies on Netflix. I just don’t have it in me. I had to take a break and get up to do something, anything, to pass the time.

Since I’m fortunate enough to still have power, I decided to bake a ton of macaroni & cheese- and document it!

*NOTE: I went a little overboard and made enough mac & cheese to serve a dozen people, or in my case, enough mac & cheese to last me a solid week and a half- so amounts and measurements may vary depending on how much of this stuff you want to bake.*

YOU WILL NEED:

* 2 1-lb. Boxes of penne pasta.

* 2 Quarts of 2% milk.

* 2 Quarts of light cream.

* 8 Cups of 4-cheese blend shredded cheese (Make sure the package DOES NOT contain mozzarella cheese!).

* 4 Large (or 8 small) Chicken bouillon cubes.

* 2 Cups potato chips.

* 2 Cups Plain bread crumbs.

* 1/2 Tablespoon of salt.

* 1/2 Tablespoon of pepper.

MacAndCheese2

MacAndCheese3

OKAY, HERE’S WHAT YOU DO:

1. Pour the 2 quarts of cream, the 2 quarts of milk, and the 8 cups of shredded cheese into a 5 quart pot and slowly bring to a boil while stirring.

2. As the sauce is boiling, gently crumble the chicken bouillon cubes into the mixture. Continue to stir.

3. As the cheese begins to melt and the cube crumbles dissolve, swap the spoon for a whisk, and whisk the mixture so it thickens as it continues to boil.

4. Add the 1/2 tablespoon of pepper. From here, if you so desire- you can add additional ingredients. I’ve heard of some people adding pieces of bacon, jalapeño pepper, bits of tomato, etc. Whatever you want! Just be sure to continue whisking the sauce to get it nice and thick.

*The sauce has to come to a boil, and not just while you’re stirring it. If you stop stirring and the sauce is not bubbling, it needs to be heated more*

5. When the sauce reaches a thick texture, let it simmer. You can now begin boiling water to pour the 2 pounds of penne pasta into. Add the 1/2 tablespoon of salt to give the pasta a little more flavor as it cooks.

MacAndCheese4

6. While your pasta cooks, and your sauce simmers, take the 2 cups of potato chips and the 2 cups of plain bread crumbs and HULK SMASH THEM TOGETHER into a bowl.

7. Preheat your oven to 350°.

8. When your pasta is done cooking (the goal is to still have some texture to it. Try not to let the penne get too soggy!), strain out the excess water and pour the pasta into a baking pan.

MacAndCheese5

9. Pour your sauce over the pasta and mix thoroughly. Try to get every piece of penne coated in the sauce.

10. Sprinkle, or shake, your crunchy chip & breadcrumb topping over the pasta and sauce.

11. When your oven is ready, heat for approximately 30 minutes. If you want your macaroni and cheese to be crunchier, heat for a little longer- roughly 45 minutes.

12. Carefully remove the baking pan from the oven and let cool.

13. SHOVEL MAC N’ CHEESE INTO MOUTH.

MacAndCheese6

The best part about making so much of this? I have enough of it left over to last me if I remain snowed in for any significant amount of time.

Quick Eats: Homemade Tomato Soup

Comment 1 Standard

TomatoSoup1

In case you haven’t heard by now, the Northeast, specifically Massachusetts, is due to get slammed with what is expected to be a record-breaking winter storm/blizzard in less than 24 hours. The estimate of snowfall amounts vary, but the last report, at least the last one that I’ve heard, says we could get more than three feet of snow over the course of tomorrow through Saturday afternoon.

Massachusetts has essentially come to a screeching halt in preparation for the worst, with state-wide school closures and public transit shutting down early. My office is closed tomorrow, and drivers have been ordered off the roads by noon- roughly the time the brunt of the storm is anticipated to hit.

I’ve got plenty of candles, blankets, DVDs, and laptop battery to get me through any potential power outages, so braving the mass hysteria at the markets today was (thankfully) not necessary, but all this talk of snow and ice and cold had me wanting to make something warm and comforting for dinner tonight- and there’s nothing more warm and comforting than homemade tomato soup.

 If you’ve got an hour, this recipe is so easy, and the result is, to me, a lot better than just heating up a can of Campbell’s Tomato Soup in the microwave for three minutes.

YOU WILL NEED:

* 1 Vidalia onion (“sweet” onion.)

* 2 Cans of whole tomatoes (I use Hunt’s brand.)

* 1/2 Quart of chicken stock.

* 8-10 Fresh basil leaves.

* 1/2 Quart of light cream.

* Sour Cream.

TomatoSoup2

OKAY, HERE’S WHAT YOU DO:

1. After slicing up the vidalia onion, pour all of your ingredients, EXCEPT the light cream & the sour cream (you use that near the end) into a 5 quart pot.

2. Bring the ingredients to a boil, and then let simmer for 1/2 hour. Stir occasionally.

3. Using a immersion hand blender, puree the ingredients inside the pot until thick in texture. *Be mindful to turn the blender off before you lift it out of your soup. Take my word for it- if you don’t- it goes everywhere.*

4. Add the 1/2 quart of light cream. Puree a little more with the immersion hand blender to mix the cream in thoroughly.

5. Simmer mixture for another 1/2 hour. Stir occasionally.

6. Pour, or spoon soup into small bowls or serving saucers. Garnish with a dollop of sour cream, a basil leaf, and any desired amount of salt and/or pepper.

7. Wrap yourself in fleece blanket, and enjoy!

TomatoSoup3

I love preparing the soup with the ingredients above because when it’s done, it doesn’t taste like you’re just eating bland liquefied tomatoes. It has a really nice, warm, full flavor to it. Perfect for apocalyptic snowy days.

To all my friends reading this in Massachusetts- stay off the roads, stay bundled up, and stay safe. I’ll see you all when the storm is over and after I tunnel my way out my front door.