Quick Eats: Turkey Reubens

Comments 2 Standard

TurkeyReuben1

I’m not a big meat eater. That’s not to say I consider myself a vegetarian or a vegan. I’ve tried both lifestyles in the past and I admire the dedication it takes to stay diligent with it. Unfortunately, it’s not something I can keep up with on a daily or permanent basis.  When it comes to being a carnivore, my usual preferences are seafood and the occasional serving of poultry. I don’t particularly like the taste of beef or pork, so these reubens (which I suppose could also be considered a fancier alternative to a simple grilled cheese sandwich, depending on how you look at it), made with freshly sliced turkey, are a nice substitute to corned beef. They’re quick and easy to make- and they taste delicious.

YOU WILL NEED:

* A griddle or frying pan.

* A spatula

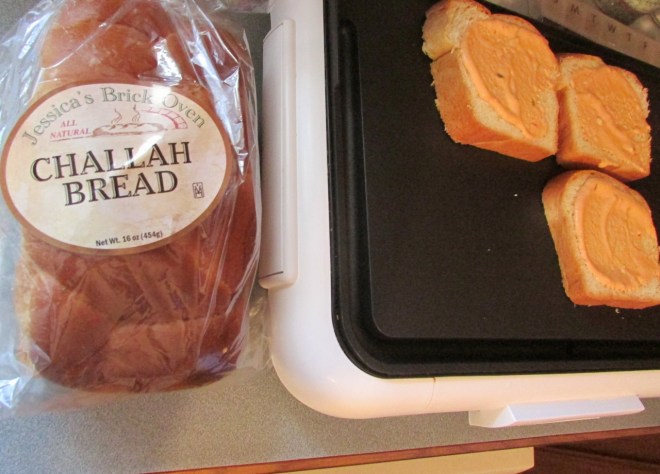
* Challah bread (or rye, depending on personal preference.)

* Butter

* Thousand island dressing

* Sliced turkey (the amount may vary depending on how many people you’re serving/reubens you’re making. I had bought a half pound and still had plenty left over to last me for the next couple of days.)

* Sliced cheddar cheese.

* Coleslaw (or sauerkraut. Again, it depends on personal preference.)

TurkeyReuben2

OKAY, HERE’S WHAT YOU DO:

1. As your griddle/frying pan is warming up, butter one side of your sliced bread of choice, placing it buttered-side down to gradually grill. On the dry side of your bread, spread a little (or a lot of. Nobody’s judging you for it,) thousand island dressing around.

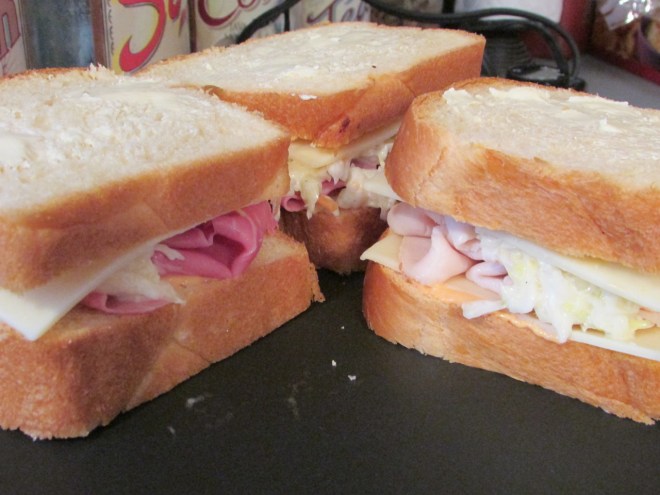
2. After you’ve got your thousand island dressing spread, layer a slice of cheddar cheese (you can do more than one, but I didn’t want it to taste too much like cheddar since there’s so many other flavors going on at once) and pile on your sliced turkey.

*NOTE* Per request, a couple of the sandwiches were made with sliced ham, instead- which explains the differences in color and texture in the meat pictured. I wasn’t using uncooked/expired/radioactive turkey or anything.

3. Once the desired cheese and meat amounts have been achieved, spoon a helping of coleslaw on top. You can use sauerkraut if you want, since that’s what typically goes on reubens, but personally I’m not a fan of the stuff, and I feel coleslaw gives the sandwich the tangy kick it needs- but with no weird aftertaste.

TurkeyReuben3

TurkeyReuben4

4. Grabbing another slice of bread, spread a little more butter on one side for even grilling. On the other side, spread more thousand island dressing. From there, press the bread- thousand island dressing-side down- on top of your coleslaw, meat, and cheese to sandwich everything together.

5. Using your spatula, continually press down and flip the sandwich on the griddle/frying pan until both sides are grilled to a crisp golden-brown. You want your slice of cheddar cheese to melt without getting too watery.

6. Remove the sandwich from the griddle/frying pan, let cool, and enjoy!

TurkeyReuben5

TurkeyReuben6

Typically I serve these reubens with a cup of soup or a small side salad. Fresh out of ingredients for either one at the time, however- I served them to some company with lightly salted, crisped potato wedges, instead.

Nobody seemed to mind. These sandwiches were a hit.

Quick Eats: Chicken & Cheese Enchiladas

Leave a comment Standard

CCEnchiladas1

Tonight I decided to mix up my usual healthy regimen of pesto and/or vegetables and cook up some very cheesy, very filling chicken enchiladas. Fair warning: this recipe isn’t exactly the healthiest thing, and I wouldn’t recommend enjoying these on a regular basis, but once in a while- a special occasion, a “cheat day” if you’re dieting, or even just to satisfy a craving- won’t hurt. These are delicious, and if chicken isn’t your thing, it can be easily supplemented with tofu or grilled vegetables. I chose chicken since that seems to be the most popular.

YOU WILL NEED:

* 1 1/2 Pounds of boneless chicken.

* 1 Tablespoon of olive oil.

* 1 Cup (or one 10 ounce can) of enchilada sauce.

* 1 Package of soft flour tortillas (burrito size).

* 1 Pouch of four-cheese Mexican blend shredded cheese.

* 1/2 Cup of of Cheez-Whiz (NOT THE AEROSOL KIND. Make sure it’s the type in a jar!)

* 1 Container of sour cream.

CCEnchiladas2

OKAY, HERE’S WHAT YOU DO:

1. Cut up the boneless chicken into small, chewable pieces, and place them into a saute pan, adding the tablespoon of olive oil to help the chicken cook properly and evenly. From there, begin to saute your chicken until the pieces are slightly caramelized and crisp. You don’t want the chicken to be dried out, so be mindful that you don’t overcook them.

2. When the chicken is crisp, add the 1 cup (10 oz. can) of enchilada sauce and let simmer briefly.

3. After giving your chicken and sauce a good stirring, add 1/2 cup of Cheez-Whiz and mix thoroughly.

CCEnchiladas3

CCEnchiladas4

4. When everything is mixed, scoop the chicken onto your flour tortillas. Be sure to leave a little of the cheese & enchilada sauce mixture left in the saute pan. You’re going to use it again in a couple of minutes.

5. Pre-heat your oven to 350°F. While it’s heating up, fold your flour tortillas and carefully place them side by side in a baking pan. Once they’re sorted, spread the excess cheese & enchilada sauce mixture over the folded tortillas.

6. Sprinkle some of the four-cheese Mexican blend shredded cheese on top of the folded tortillas. Depending on how cheesy you want these to turn out, you can add as much as you want.

CCEnchiladas5

CCEnchiladas6

7. By now, your oven should have reached the necessary temperature. Take your baking pan jam-packed with enchiladas and bake for approximately 12-15 minutes in the oven- just enough time to melt the cheese and lightly toast the flour tortillas.

8. Remove the baking pan and enchiladas from the oven, let cool, and apply a generous amount of sour cream on top.

9. Garnish as desired (I used a little chopped parsley to add some green to an otherwise very orange looking dish before serving these.)

10. INTRODUCE ENCHILADAS TO STOMACH.

Like I said before, this meal isn’t super healthy, but it won’t cause any kind of irreversible damage if you have them once in a great while. There are ways to make them more fit-friendly, whether it be substituting certain ingredients or cutting portion sizes, but I thought this was a well-deserved treat.

CCEnchiladas7

Quick Eats: Baked Macaroni & Cheese

Leave a comment Standard

MacAndCheese1

I’m officially snowed in for the weekend (SNOWPOCALYPSE 2013!), and I physically CANNOT watch any more movies on Netflix. I just don’t have it in me. I had to take a break and get up to do something, anything, to pass the time.

Since I’m fortunate enough to still have power, I decided to bake a ton of macaroni & cheese- and document it!

*NOTE: I went a little overboard and made enough mac & cheese to serve a dozen people, or in my case, enough mac & cheese to last me a solid week and a half- so amounts and measurements may vary depending on how much of this stuff you want to bake.*

YOU WILL NEED:

* 2 1-lb. Boxes of penne pasta.

* 2 Quarts of 2% milk.

* 2 Quarts of light cream.

* 8 Cups of 4-cheese blend shredded cheese (Make sure the package DOES NOT contain mozzarella cheese!).

* 4 Large (or 8 small) Chicken bouillon cubes.

* 2 Cups potato chips.

* 2 Cups Plain bread crumbs.

* 1/2 Tablespoon of salt.

* 1/2 Tablespoon of pepper.

MacAndCheese2

MacAndCheese3

OKAY, HERE’S WHAT YOU DO:

1. Pour the 2 quarts of cream, the 2 quarts of milk, and the 8 cups of shredded cheese into a 5 quart pot and slowly bring to a boil while stirring.

2. As the sauce is boiling, gently crumble the chicken bouillon cubes into the mixture. Continue to stir.

3. As the cheese begins to melt and the cube crumbles dissolve, swap the spoon for a whisk, and whisk the mixture so it thickens as it continues to boil.

4. Add the 1/2 tablespoon of pepper. From here, if you so desire- you can add additional ingredients. I’ve heard of some people adding pieces of bacon, jalapeño pepper, bits of tomato, etc. Whatever you want! Just be sure to continue whisking the sauce to get it nice and thick.

*The sauce has to come to a boil, and not just while you’re stirring it. If you stop stirring and the sauce is not bubbling, it needs to be heated more*

5. When the sauce reaches a thick texture, let it simmer. You can now begin boiling water to pour the 2 pounds of penne pasta into. Add the 1/2 tablespoon of salt to give the pasta a little more flavor as it cooks.

MacAndCheese4

6. While your pasta cooks, and your sauce simmers, take the 2 cups of potato chips and the 2 cups of plain bread crumbs and HULK SMASH THEM TOGETHER into a bowl.

7. Preheat your oven to 350°.

8. When your pasta is done cooking (the goal is to still have some texture to it. Try not to let the penne get too soggy!), strain out the excess water and pour the pasta into a baking pan.

MacAndCheese5

9. Pour your sauce over the pasta and mix thoroughly. Try to get every piece of penne coated in the sauce.

10. Sprinkle, or shake, your crunchy chip & breadcrumb topping over the pasta and sauce.

11. When your oven is ready, heat for approximately 30 minutes. If you want your macaroni and cheese to be crunchier, heat for a little longer- roughly 45 minutes.

12. Carefully remove the baking pan from the oven and let cool.

13. SHOVEL MAC N’ CHEESE INTO MOUTH.

MacAndCheese6

The best part about making so much of this? I have enough of it left over to last me if I remain snowed in for any significant amount of time.

Quick Eats: Homemade Tomato Soup

Comment 1 Standard

TomatoSoup1

In case you haven’t heard by now, the Northeast, specifically Massachusetts, is due to get slammed with what is expected to be a record-breaking winter storm/blizzard in less than 24 hours. The estimate of snowfall amounts vary, but the last report, at least the last one that I’ve heard, says we could get more than three feet of snow over the course of tomorrow through Saturday afternoon.

Massachusetts has essentially come to a screeching halt in preparation for the worst, with state-wide school closures and public transit shutting down early. My office is closed tomorrow, and drivers have been ordered off the roads by noon- roughly the time the brunt of the storm is anticipated to hit.

I’ve got plenty of candles, blankets, DVDs, and laptop battery to get me through any potential power outages, so braving the mass hysteria at the markets today was (thankfully) not necessary, but all this talk of snow and ice and cold had me wanting to make something warm and comforting for dinner tonight- and there’s nothing more warm and comforting than homemade tomato soup.

 If you’ve got an hour, this recipe is so easy, and the result is, to me, a lot better than just heating up a can of Campbell’s Tomato Soup in the microwave for three minutes.

YOU WILL NEED:

* 1 Vidalia onion (“sweet” onion.)

* 2 Cans of whole tomatoes (I use Hunt’s brand.)

* 1/2 Quart of chicken stock.

* 8-10 Fresh basil leaves.

* 1/2 Quart of light cream.

* Sour Cream.

TomatoSoup2

OKAY, HERE’S WHAT YOU DO:

1. After slicing up the vidalia onion, pour all of your ingredients, EXCEPT the light cream & the sour cream (you use that near the end) into a 5 quart pot.

2. Bring the ingredients to a boil, and then let simmer for 1/2 hour. Stir occasionally.

3. Using a immersion hand blender, puree the ingredients inside the pot until thick in texture. *Be mindful to turn the blender off before you lift it out of your soup. Take my word for it- if you don’t- it goes everywhere.*

4. Add the 1/2 quart of light cream. Puree a little more with the immersion hand blender to mix the cream in thoroughly.

5. Simmer mixture for another 1/2 hour. Stir occasionally.

6. Pour, or spoon soup into small bowls or serving saucers. Garnish with a dollop of sour cream, a basil leaf, and any desired amount of salt and/or pepper.

7. Wrap yourself in fleece blanket, and enjoy!

TomatoSoup3

I love preparing the soup with the ingredients above because when it’s done, it doesn’t taste like you’re just eating bland liquefied tomatoes. It has a really nice, warm, full flavor to it. Perfect for apocalyptic snowy days.

To all my friends reading this in Massachusetts- stay off the roads, stay bundled up, and stay safe. I’ll see you all when the storm is over and after I tunnel my way out my front door.